Table of Contents
Let's be honest, your cat probably has more toys than you have socks, and half of them are ignored or shredded within minutes. Those fancy store-bought ones? Often overpriced and under-loved. What if you could whip up something durable, delightful, and completely customized for your feline overlord? Something that actually holds their attention, maybe even sparks a little hunting instinct?
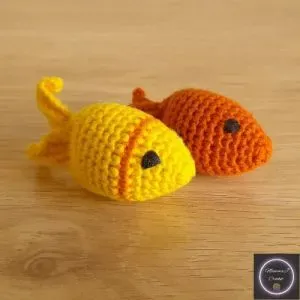
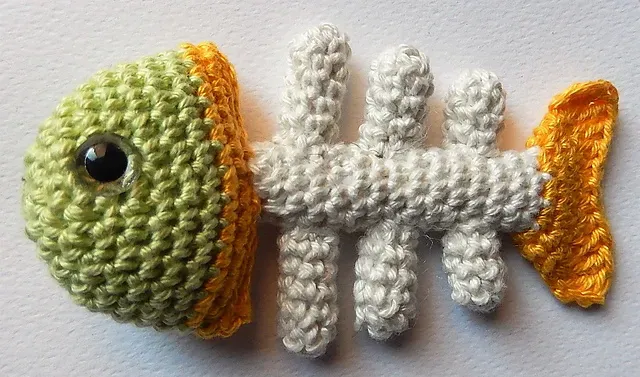
Why Your Cat Needs a Crochet Fish Toy
Why Your Cat Needs a Crochet Fish Toy
Tapping into Those Primal Instincts
Look, cats are tiny, adorable predators, even if their biggest hunt involves a dust bunny under the sofa. They have this hardwired need to stalk, chase, and pounce. A floppy, lightweight crochet fish is just the right size and shape to trigger that instinct. It mimics the erratic movement of prey when batted around, providing that satisfying challenge they crave. Unlike some rigid plastic things, a yarn toy feels interesting in their mouth and claws, offering a different sensory experience that keeps them engaged longer than you might expect.
Safer, Customizable Fun
You know those little plastic eyes or bells on some commercial cat toys? The ones that inevitably get chewed off and potentially swallowed? Handmade crochet toys generally skip those choking hazards. You can stuff them with safe polyfil and, crucially, add a generous dose of fresh catnip (or silvervine, if that's your cat's jam). Plus, you control the materials. Got a cat who loves bright colors? Pick vibrant yarn. Sensitive to certain textures? Choose a softer fiber. It's a toy tailored specifically for your discerning furball, made with actual thought and zero questionable adhesives.
- Satisfies natural hunting drives.
- Provides engaging texture and movement.
- Allows for safer, non-toxic materials.
- Completely customizable for your cat's preferences.
- Way more satisfying to make than buying another crinkly ball.
Supplies You'll Need for This Crochet Fish Cat Toy Pattern
Supplies You'll Need for This Crochet Fish Cat Toy Pattern
Picking the Right Yarn and Hook
Alright, let's talk materials for this crochet fish cat toy pattern. You aren't going to need anything fancy here. Dig through your stash for some worsted weight yarn, also known as size 4. Acrylic is perfectly fine – it's durable, washable, and comes in a million colors. Cotton yarn works too, just make sure it's not splitting like crazy. Avoid anything super fuzzy or with loose fibers that could be easily chewed off and ingested. We're aiming for safety first, then maximum playability. For the hook, a 3.5mm or 4.0mm (US size E or G) is usually spot on for getting a nice, tight fabric that holds its stuffing and stands up to enthusiastic claws. If your stitches are too loose, size down; too tight and you'll fight every single one.
Stuffing and Optional Catnip Goodies
Once you've got your fish crocheted, it needs some guts. Standard polyester fiberfill, the same stuff you'd use for pillows or stuffed animals, is the go-to. It's cheap, readily available, and holds its shape. Stuff it firmly, but not so much that the stitches stretch open. Now for the magic ingredient: catnip. Dried catnip leaves or potent catnip pellets tucked inside with the polyfil will turn a simple toy into a feline obsession. If your cat doesn't react to catnip (some don't, the weirdos), try silvervine or valerian root – sometimes those do the trick. We're skipping the plastic safety eyes, by the way; a bit of black yarn embroidered on is much safer.
- Worsted weight yarn (size 4, acrylic or cotton)
- 3.5mm or 4.0mm crochet hook (US E or G)
- Polyester fiberfill (Polyfil)
- Tapestry needle (for weaving in ends)
- Scissors
- Optional: Dried catnip, silvervine, or valerian root
Understanding the Stitches for Your Crochet Fish Cat Toy

Understanding the Stitches for Your Crochet Fish Cat Toy
before we dive headfirst into the actual crochet fish cat toy pattern, let's quickly go over the moves your hook needs to know. Don't sweat it if you're new to this; we're talking about the absolute basics here. You'll mostly be dealing with single crochet stitches, often abbreviated as 'sc'. Think of it as the building block of crochet fabric. We'll also use increases ('inc') to make the fish wider and decreases ('dec') to shape the tail and head. That's really it. Master these three, and you can make this fish. It's like learning three chords on a guitar – suddenly, you can play a surprising number of songs (or in this case, make a solid cat toy).
- Single Crochet (sc): The fundamental stitch. Insert hook, yarn over, pull up a loop (two loops on hook), yarn over, pull through both loops.
- Increase (inc): Usually means working two single crochet stitches into the same stitch from the previous row or round. This makes your piece wider.
- Decrease (dec): Combining two stitches into one to make your piece narrower. Common methods are sc2tog (single crochet two together) or invisible decrease.
Following the Crochet Fish Cat Toy Pattern: StepbyStep

Following the Crochet Fish Cat Toy Pattern: StepbyStep
Starting the Fishy Foundation
Alright, hook in hand, yarn ready? Let's get this crochet fish cat toy pattern rolling. Most amigurumi patterns, including this little fish, start with a magic ring (or magic circle). If that sounds intimidating, don't panic. It's just a way to start working in the round without a hole in the middle. You'll make a small loop, work your first few stitches into it, and then pull the tail tight to close the circle. It's neater than chaining and joining. After your magic ring, you'll typically work a set number of single crochet stitches into it. Then, you'll start increasing. This means working two single crochet stitches into a single stitch from the previous round, gradually making your circle bigger to form the widest part of the fish's body. Keep track of your rounds; a stitch marker is your best friend here.
Building the Body and Shaping
Once you've got the base circle established, you'll continue increasing over several rounds according to the crochet fish cat toy pattern. This builds out the main body of the fish. You'll reach a point where you stop increasing and just work one single crochet stitch in each stitch around for a few rounds. This creates the straight section of the body. Think of it like building the middle part of a sausage before tapering the ends. After that straight section, it's time to start decreasing. Decreases, remember, bring stitches together, making the piece narrower. You'll strategically place these decreases to start shaping the tail end of the fish. Don't forget to pause occasionally and push the fabric into a fish shape to see how it's coming along.
- Start with a magic ring for a neat beginning.
- Use single crochet (sc) as your primary stitch.
- Increase (inc) stitches to widen the body.
- Work even rounds (sc in each stitch) for the straight section.
- Decrease (dec) stitches to shape the tail.
- Use a stitch marker to keep track of your rounds.
Finishing and Stuffing Your Crochet Fish Cat Toy
Finishing and Stuffing Your Crochet Fish Cat Toy
Getting the Stuffing Just Right
you've crocheted your fishy shell following the crochet fish cat toy pattern, and it's looking pretty good. Now comes the messy but crucial part: stuffing. Grab that polyfill. Don't just shove a big wad in there. Start with small handfuls and work them into the head and tail areas first. Use the blunt end of your crochet hook or a chopstick to push the stuffing firmly into those tight spots. You want the fish to be plump and hold its shape, but not so overstuffed that the stitches are straining or you can see gaps. Think firm, not rock hard. This is also the perfect time to bury a generous pinch of dried catnip or a few silvervine pellets deep inside the stuffing. Distribute it throughout the body so every swat releases a little bit of that good stuff.
Closing Up Shop Securely
Once your fish is stuffed to your satisfaction – firm but squishy enough to be interesting to a cat – it's time to close the opening. If you've been decreasing to a small hole, you'll likely just need to sew it shut. Cut your yarn, leaving a decent tail (say, 8-10 inches), thread it onto your tapestry needle. Then, you'll whip stitch or mattress stitch across the opening, pulling it tight as you go to cinch it closed neatly. The goal here is a secure seam that can withstand enthusiastic bunny kicks and chewing. After the seam is closed, weave that yarn tail back and forth through the stuffing inside the fish multiple times before trimming it flush with the fabric. This hides the tail and makes it much harder for your cat to pull it out and unravel your hard work. A loose yarn tail is just an invitation for destruction.
- Stuff firmly but avoid overstuffing.
- Use small pieces of polyfill for even distribution.
- Push stuffing into head and tail with a tool.
- Bury catnip or silvervine inside the stuffing.
- Cut a long yarn tail for sewing and weaving.
- Sew the opening shut with a tapestry needle.
- Weave yarn tail securely through the stuffing multiple times.
- Ensure no loose ends are accessible to your cat.
Your Cat's New Favorite Toy
So there you have it. You’ve taken some yarn and a hook and transformed them into a potential source of endless amusement for your furry friend. Forget those expensive, quickly-destroyed store-bought options. You've crafted something with your own hands, tailored specifically for maximum feline engagement. Now, sit back and watch your cat go absolutely bonkers for their new, handmade crochet fish. Just don't be surprised if you find it under the sofa five minutes later.