Table of Contents
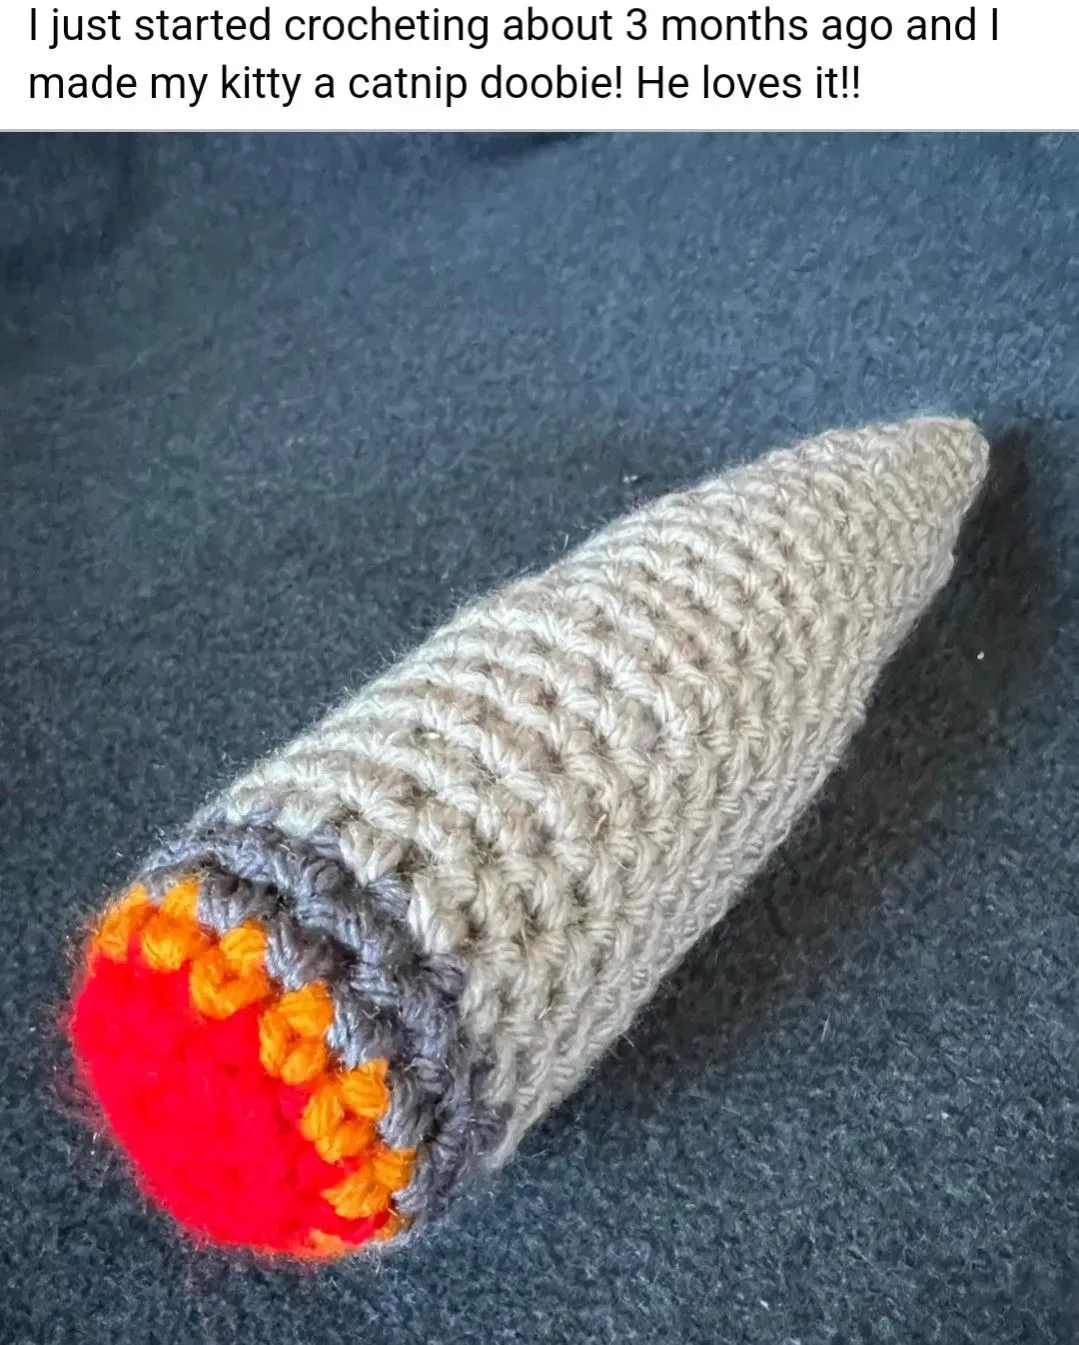
Let's be honest, cats are weird. They turn up their noses at the expensive, fancy toys but become obsessed with a stray bottle cap or a dust bunny. So, why not lean into the absurdity and make them something truly unique? Something that might make guests do a double-take? If you're looking for a project that's both fun to make and delightfully silly, you've landed in the right spot. We're diving headfirst into crafting a "joint" for your feline friend, but don't worry, it's strictly catnip-fueled fun, no actual smoke involved. This article lays out everything you need to follow the specific crochet joint cat toy pattern.
Why a Crochet Joint Cat Toy Pattern? It's Purrfectly Absurd
Why a Crochet Joint Cat Toy Pattern? It's Purrfectly Absurd
Because Normal is Boring, and Cats Agree
Let's face it, most cat toys look like they were designed by someone who's never actually met a cat. Tiny plastic mice that disappear under the sofa in five minutes? Feather wands that last roughly seventeen seconds? Your cat deserves better, or at least, something more interesting to ignore. This is where the crochet joint cat toy pattern comes in. It's intentionally ridiculous, a conversation starter, and frankly, a lot more entertaining for the human observer than watching your cat chase a laser dot up a wall.
My own cat, Bartholomew, a creature of discerning taste (mostly for discarded bottle caps and shoelaces), immediately gravitated towards the first prototype I made. He sniffed it skeptically, batted it across the floor, and then proceeded to bunny-kick it with the ferocity of a tiny, furry martial artist. It wasn't the shape itself, probably, but the texture and the fact that it wasn't a store-bought disappointment. Making your own allows for customization – maybe extra-firm stuffing for the shredders, or a hidden pocket for maximum catnip potential.
Why This Specific Shape Works (Maybe?)
Beyond the sheer humor factor, the shape of a crochet joint cat toy pattern actually has some functional benefits for feline play. Its elongated form makes it ideal for those classic "bunny kicks" where a cat grabs the toy with their front paws and goes to town with their back legs. It’s also easy for them to carry around in their mouth, proudly presenting their "kill" at your feet, usually when you have guests over. Plus, it’s a fantastic way to use up those small bits of yarn you have lying around – a little white, a little beige, maybe a touch of red or orange for the tip.
It's a quick project too. You can whip one up in an evening, making it an almost instant gratification craft. And unlike some intricate amigurumi, the simple shape means fewer fiddly bits for your cat to chew off and potentially swallow. It’s sturdy, washable (if you use the right yarn), and provides a unique tactile experience for your cat compared to plastic or fabric toys.
Why choose this pattern?
- It's hilarious and unique.
- Cats seem to love the shape for bunny kicks.
- Great for using up yarn scraps.
- Quick and satisfying to make.
- More durable than many store-bought options.
Gathering Your Stash: What You Need for Your Crochet Joint Cat Toy
Gathering Your Stash: What You Need for Your Crochet Joint Cat Toy
Picking Your Fibers: Safety First, Style Second (Maybe)
Alright, before you dive into this crochet joint cat toy pattern, you need supplies. The most critical decision is your yarn. Since this is going directly into a cat's mouth and will likely be subjected to enthusiastic chewing, skip the acrylic. It sheds microplastics and isn't great if ingested. Stick to natural fibers like 100% cotton or bamboo. These are much safer for your furball. You'll need a main color for the "paper" part – something off-white or beige works best. Then grab a small amount of red or orange for the "cherry" at the tip and maybe a tiny bit of black for the filter end, though that's optional depending on how realistic you want to get. Think of it as building your tiny, questionable stash.
Tools of the Trade: Beyond Just Yarn
Beyond the yarn, you'll need a few standard crochet tools. A 2.5mm or 3mm hook is usually a good size for DK weight yarn, creating a tight fabric so the stuffing doesn't escape easily. You'll also need a yarn needle for weaving in ends and assembling, some sharp scissors, and stuffing. Fiberfill works, but if you want to be extra eco-friendly, you can chop up old t-shirts or use natural wool batting. And for the grand finale, the catnip. Good quality, potent catnip is key here. Don't skimp. A pinch inside makes the final product infinitely more appealing than just plain stuffing. Gathering these bits and bobs is the first concrete step in bringing your hilarious crochet joint cat toy pattern to life.
Here's a quick list of what to round up:
- 100% cotton or bamboo yarn (off-white/beige, red/orange, optional black)
- 2.5mm or 3mm crochet hook
- Yarn needle
- Scissors
- Stuffing (fiberfill or natural alternative)
- Catnip (the good stuff)
Stitching It Up: The StepbyStep Crochet Joint Cat Toy Pattern
Getting Started: The Foundation and the Filter
Alright, hook in hand? Yarn ready? Excellent. The first step in this crochet joint cat toy pattern is building the base, specifically the "filter" end. Most patterns start with a magic circle. If you're not friends with the magic circle yet, there are plenty of tutorials online, or you can chain 2 and work your stitches into the second chain from the hook – just make sure the hole is small. You'll typically make a small number of single crochet stitches into that circle, maybe 6 or 8. Pull the circle tight. Then, you'll work a couple of rounds, perhaps increasing in the second round to get a slightly wider base, keeping it a nice tight cylinder for the filter section. Use your black or dark gray yarn here if you're adding a filter.
Seriously, don't skip the stitch marker. It's a tiny piece of plastic or yarn, but it saves you the headache of constantly counting rounds and trying to figure out where the heck you started. Just pop it in the first stitch of each round as you go. Work a few rounds in your filter color until it's about the length you want for that end bit – maybe half an inch to an inch, depending on how large you're making the overall toy based on your chosen crochet joint cat toy pattern.
Building the Body: Straight Rows and Color Changes
Once the filter is done, it's time for the main event: the "paper" section. This is where you'll switch to your main color – the off-white or beige. The body is usually worked in continuous rounds of single crochet without any increases or decreases for a while. This creates the straight, cylindrical shape. Just keep going, round after round, until you reach the desired length before the tapering tip begins. This is the longest part of the process, so maybe put on a podcast or your favorite questionable reality show.
Some patterns might have you carry the yarn up the inside, others might have you cut and tie off. Since this is a toy for a cat, keeping the inside neat and avoiding long tails is a good idea. Work those single crochets, keeping your tension consistent so you don't end up with a lumpy, sad-looking joint. The goal is a firm, even tube.
Step | Action | Yarn Color |
|---|---|---|
1 | Start with Magic Circle (or Ch 2) | Black/Dark Gray (Optional) |
2 | SC rounds (possibly with increase) | Black/Dark Gray (Optional) |
3 | Switch Yarn | Off-White/Beige |
4 | SC rounds (no increase/decrease) | Off-White/Beige |
Tapering the Tip: Decreases and the Cherry
As you get towards the end of the main body, it's time to start shaping the tip. This involves decreases. You'll work rounds where you single crochet two stitches together (sc2tog or invdec). The specific decrease pattern will depend on the exact crochet joint cat toy pattern you're following, but generally, you'll decrease evenly around the round, then work a plain SC round, then decrease again, gradually closing the tube. This creates that tapered end.
Before you close it completely, you'll switch to your red or orange yarn for the "cherry" tip. Work just one or two rounds in this color, doing decreases as the pattern instructs, until the opening is quite small. This is also the point where you'll start thinking about stuffing it. Don't wait until it's fully closed, or you'll have a devil of a time getting the stuffing in evenly.
Stuffing and Finishing Your Fabulous Feline Friend's New Toy
Stuffing and Finishing Your Fabulous Feline Friend's New Toy
Stuffing and Finishing Your Fabulous Feline Friend's New Toy
you've got this slightly questionable cylinder of crochet goodness. Now comes the satisfying part: stuffing it. Don't just shove the fiberfill in willy-nilly. Take small bits and push them in firmly, using the back of your crochet hook or a chopstick to get it packed in tightly. A firmly stuffed toy holds its shape better and is more satisfying for a cat to sink their claws into. And yes, this is the crucial moment for the catnip. Sprinkle a generous amount in layers as you stuff – don't just put a tiny bit in the middle. You want that potent aroma to permeate the entire toy. Some people even soak the stuffing in a catnip spray first, but straight dried leaves usually do the trick. Once it's stuffed to your liking, firm but not bulging, you'll make your final decreases to close the remaining hole. Use your yarn needle to weave the tail through the last few stitches and pull it tight to cinch it shut, then weave in the end securely inside the toy. Give your crochet joint cat toy pattern creation a final squeeze to distribute the stuffing and catnip, and behold! Your masterpiece is complete.
Your Cat's New Favorite, Slightly Scandalous, Toy
So there you have it. You've navigated the stitches, managed the color changes, and now you possess a handmade cat toy that is undeniably unique. Your feline overlord now has a "joint" to call their own, perfect for swatting, chasing, and perhaps even a little light drooling. Whether you stuffed it with fiberfill, a generous dose of catnip, or a mix of both, you've created something far more interesting than another generic felt mouse. Enjoy the show as your cat gets acquainted with their new, slightly unconventional plaything. Just be prepared for the questions from visitors.