Table of Contents
Let's be honest, most cats have very specific opinions about toys. They'll ignore the expensive, fancy ones you bought with such hope, only to become utterly obsessed with a stray dust bunny or the plastic ring from a milk jug. If you're tired of shelling out cash for toys that end up under the sofa forever, or worse, ignored entirely, maybe it's time to take matters into your own hands. You can create something truly appealing, something with just the right texture and, if you're feeling generous, a little nip inside.
Ready to Hook? What You Need for This Free Crochet Mouse
Ready to Hook? What You Need for This Free Crochet Mouse
Gathering Your Yarn and Hook
Alright, so you're ready to tackle this crochet mouse cat toy pattern free of charge? Excellent. First things first, let's talk about the stuff you'll actually be working with. You're going to need some yarn. Cotton or a cotton blend is usually the go-to for pet toys. Why? Because it's durable, washable (because let's face it, cat toys get gross), and it doesn't shed microplastics like some acrylics might, which is probably a good idea if your cat is going to be batting it around and potentially gnawing on it. A small amount is all it takes, perfect for using up those little scraps you've got lying around. As for your hook, a size that gives you a nice, tight fabric is key. You don't want big holes for stuffing or little claws to get snagged in. A G-6 (4.0mm) or H-8 (5.0mm) hook often works well with standard worsted weight yarn, but check your yarn label and maybe make a quick test swatch.
Stuffing and the All-Important Catnip
Now, what goes inside the little critter? Fiberfill stuffing is standard. It's soft, squishy, and holds its shape. You won't need much for one mouse, just enough to make it plump and throwable, but not rock hard. Here's where you can really make it appealing: catnip. Dried catnip tucked inside with the fiberfill can turn a simple crochet mouse into a furry friend's absolute obsession. Just be mindful of how much you use; some cats go absolutely wild, others are completely indifferent. Test the waters. You can also skip the catnip entirely if your cat isn't a fan or if you prefer not to use it. The mouse is still a fun shape to chase.
so to recap the essentials before we move on:
- Small amount of durable yarn (cotton or blend recommended)
- Crochet hook (size appropriate for yarn, aiming for tight stitches)
- Fiberfill stuffing
- Optional: Dried catnip
Finishing Touches and Other Tools
Beyond the main ingredients, you'll need a few other bits and bobs to bring your mouse to life. A pair of sharp scissors is non-negotiable for snipping yarn ends. A tapestry needle (or yarn needle) is crucial for weaving in those ends neatly and sewing on the ears and tail securely. Nobody wants yarn tails unraveling during a vigorous play session. Stitch markers can be helpful, especially if you're new to working in the round, to keep track of where your rows start and end. And if you want to add eyes or a nose, think about embroidery floss or yarn instead of plastic safety eyes which can be a choking hazard for determined chewers. Keep it simple, keep it safe for the intended recipient.
Stitching Up the Body: Following the Crochet Mouse Cat Toy Pattern
Stitching Up the Body: Following the Crochet Mouse Cat Toy Pattern
Starting the Mouse Body: The Magic Ring and First Rounds
you've got your yarn and hook ready. Time to actually start creating this crochet mouse cat toy pattern masterpiece. Most amigurumi patterns, including this one, kick off with a magic ring (also called a magic circle or adjustable ring). This creates a tight center hole so you don't have stuffing poking out. You work a set number of single crochet stitches into this ring, then pull it tight. If magic rings feel like black magic, don't sweat it. You can chain 2 and work the single crochets into the first chain instead, it just leaves a tiny hole. After your initial stitches in the ring, you'll typically increase in the next few rounds. Increasing means making two stitches in one stitch from the previous round, which makes your circle grow. Think of it like adding extra slices to a pie to make it bigger.
Shaping the Body: Increasing and Working Evenly
Once you've done a few rounds of increases, you'll have a flat-ish circle forming. This is the widest part of your mouse's body. The pattern will then instruct you to work "even" rounds. This means you'll make just one single crochet in each stitch around, without increasing. Working evenly makes the fabric grow upwards, forming the cylindrical or slightly tapered shape of the mouse body. Keep track of your rounds here, a stitch marker is your best friend. You'll work even rounds until the body is long enough before you start decreasing to form the nose end. This is where the mouse starts looking less like a flat disc and more like something a cat might actually hunt.
Here's a typical sequence for the mouse body:
- Start with a magic ring.
- Increase in the first few rounds to widen the base.
- Work several rounds evenly to build height.
- Begin decreasing to shape the nose.
- Stuff the body before closing.
Ears, Tail, and Stuffing: Finishing Your Crochet Cat Toy
Ears, Tail, and Stuffing: Finishing Your Crochet Cat Toy
Packing the Punch: Stuffing Your Mouse
Alright, you've got the body shape sorted, probably looking a bit like a sad, empty sock at this stage. Now comes the fun part: giving it some life, literally. Grab that fiberfill stuffing. Don't be shy, but don't overstuff it either. You want it firm enough to hold its shape and be satisfying to bat around, but still have a bit of give. Shove small bits in at a time using your fingers or the back of your crochet hook. Get it right into the nose end first to make sure it's nice and pointed. If you're using catnip, now's the time to tuck a pinch or two in amongst the fiberfill. A little goes a long way for some cats; others act like you gave them plain air. You'll figure out your cat's preference. Make sure the stuffing is evenly distributed so you don't end up with a lopsided mouse.
Giving it Character: Adding Ears
Every proper mouse needs ears, right? These are typically made separately and then sewn onto the head. They're usually just small circles or semi-circles worked in single crochet. Keep them relatively small – you're making a mouse, not a Dumbo impersonator. Make two identical pieces. Decide where you want them placed on the head; generally, just behind the widest part works well. Pin them in place first to see how they look before you commit. Use your tapestry needle and a piece of matching yarn to whip stitch or mattress stitch them securely onto the body. Go around the edge a couple of times to make sure they aren't going anywhere during a vigorous hunt. Weave in those ends *really* well inside the body.
Quick checklist for ears:
- Crochet two small ear pieces (usually simple circles).
- Pin them in place on the mouse head.
- Sew securely using a tapestry needle.
- Weave in yarn tails inside the body.
The Crucial Wiggle: Crafting the Tail
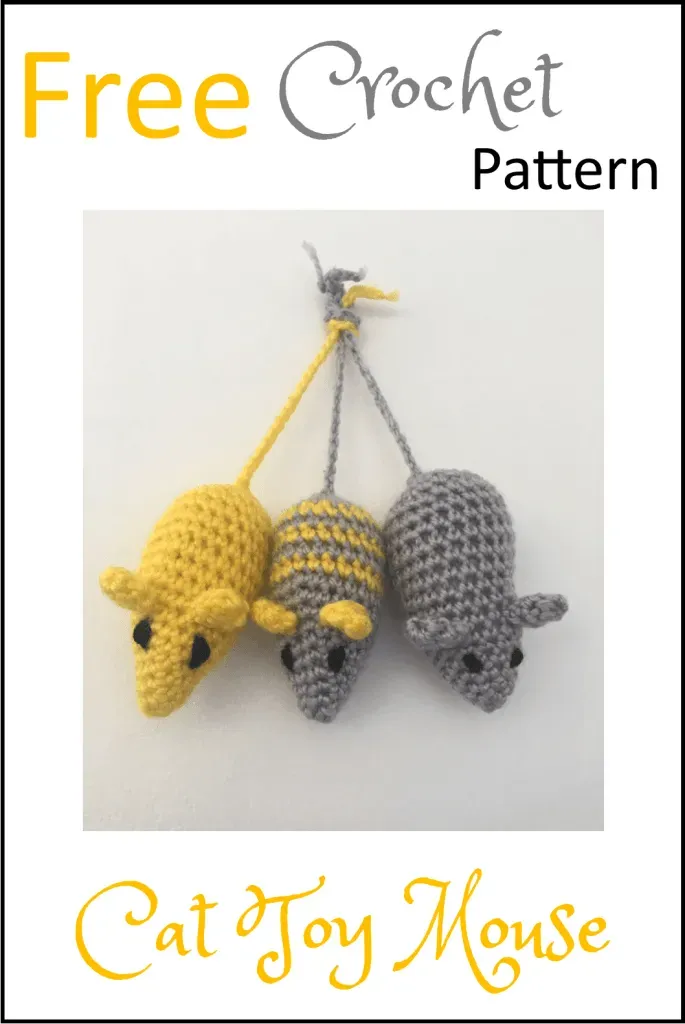
The tail is arguably the best part, the bit cats really love to chase and grab. There are a few ways to make a tail for your crochet mouse cat toy pattern project. The simplest is a chain of single crochet stitches, maybe 15-20 stitches long depending on how lengthy you want it. Fasten off, leaving a long tail for sewing. Another option is a simple yarn tail: cut several strands of yarn, fold them in half, and pull the loop through a stitch at the back of the mouse body using your hook. Thread the yarn ends through the loop and pull tight to secure, creating a tassel-like tail. Both work. Sew the crocheted chain tail firmly to the back of the mouse, weaving the end back into the body. For the yarn tail, just give it a trim to your desired length. A long, thin tail is definitely a crowd-pleaser in the feline community.
Making it Yours: Customizing Your Crochet Mouse Cat Toy Pattern
Making it Yours: Customizing Your Crochet Mouse Cat Toy Pattern
Playing with Color and Texture
Once you've got the basic crochet mouse cat toy pattern down, there's no rule saying it has to be plain gray or brown. This is your chance to get creative! Think vibrant neons, subtle pastels, or even stripes. Cats don't care about your color coordination skills, but it makes them more fun for *you* to make and look at. You can also experiment with different yarn textures. A slightly fuzzy yarn can make the mouse feel more like actual prey (in the least creepy way possible), or a sparkly thread held along with the main yarn can add a bit of flash. Just make sure whatever yarn you choose is still durable and safe for your cat to bat around. Using up those weird single skeins in your stash? This is the perfect project.
Adding Flair and Function
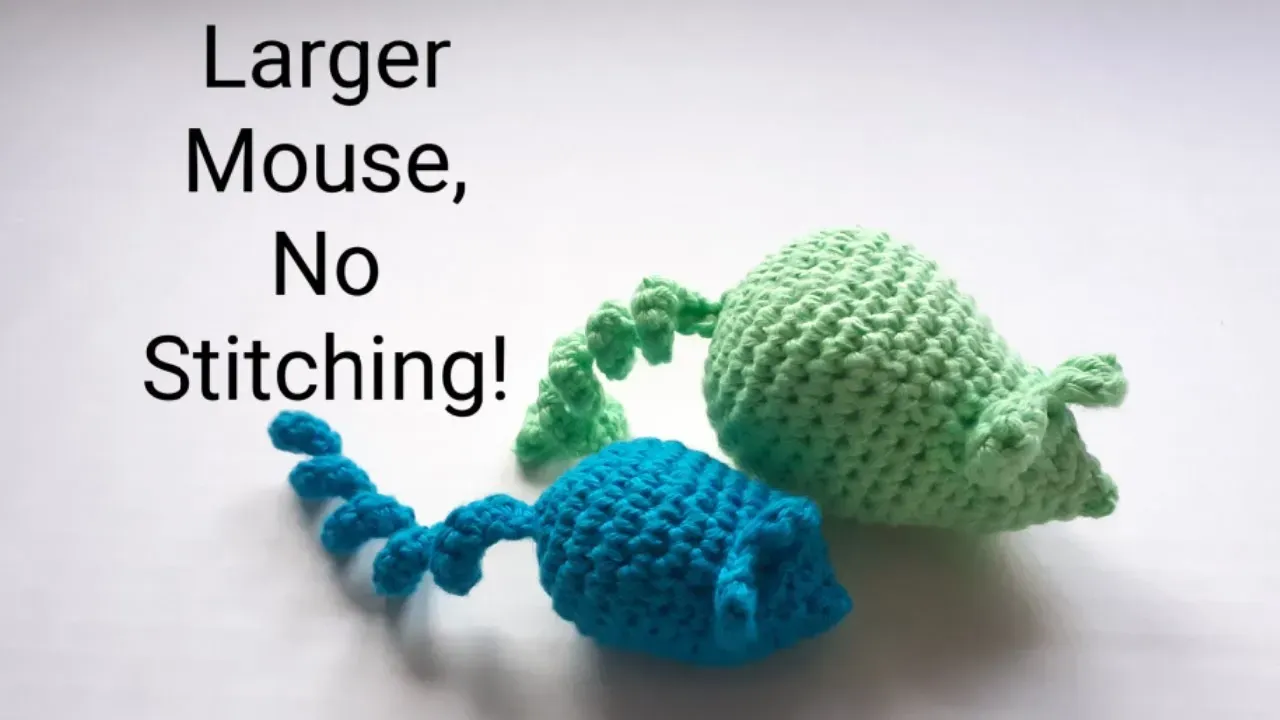
Beyond just color, you can tweak the crochet mouse cat toy pattern free to add other features. Want a bigger mouse? Use a thicker yarn and a larger hook, or simply add more increase rounds before working evenly. A smaller mouse? Go thinner on the yarn and hook, or do fewer increases. You can also change the tail – make it extra long, curly (by chaining extra stitches and then working slip stitches back down the chain), or even braided yarn. Consider adding embroidered eyes or a nose with black or pink yarn for a bit more character, just stitch them on firmly. Some people like to add a jingle bell *inside* the stuffing, but be cautious; make sure it's securely enclosed and not something your cat could chew through and swallow. The idea is to enhance the toy, not create a hazard.
Here are a few ways to customize your mouse:
- Change yarn color for a different look.
- Experiment with yarn texture (fuzzy, sparkly).
- Adjust size by changing yarn/hook or stitch counts.
- Vary the tail length or style (chain, yarn tassel).
- Add embroidered features (eyes, nose).
Your Cat's New Favorite (Maybe)
So there you have it. A simple, free pattern to whip up a crochet mouse for your cat. It doesn't require a massive yarn stash or advanced skills, just a bit of time and patience. Whether your cat becomes instantly obsessed, carries it around like a trophy, or gives it the classic slow blink of approval before batting it under the fridge is, of course, entirely up to them. But at least you didn't spend ten bucks on something they ignored. Give it a shot, and see if your handmade mouse passes the ultimate feline test.