Table of Contents
Let's be honest, a bored cat is usually a mischievous cat. They eye your furniture like a scratching post buffet or decide 3 AM is the perfect time for zoomies across your head. You could drop a small fortune on fancy store-bought gadgets, the ones promising hours of endless fascination (that usually last about five minutes). Or, you could dive into the world ofdiy cat interactive toys. It's less about saving a few bucks (though that's a nice bonus) and more about giving your feline overlord something that actually holds their attention for longer than a commercial break.
Why Bother? The Perks of Making Your Own Cat Toys
Why Bother? The Perks of Making Your Own Cat Toys
so you're thinking, "Why would I spend time making a cat toy when I can just grab one off the shelf?" Fair question. But here's the thing: those store-bought toys, while sometimes okay, often lack that certain something. They’re generic. Your cat is not. Making your owndiy cat interactive toyslets you tap into your cat's unique personality. Does Mittens go nuts for crinkle sounds? Does Clawdius prefer something he can bunny-kick into oblivion? When you DIY, you can tailor the toy precisely to their quirky preferences. It’s like getting them a custom-made suit versus something off the rack at a discount store.
Beyond the personalized touch, there's the sheer cost savings. Let's be real, cat toys can be surprisingly expensive for what they are – often just some fabric and stuffing. And how many times have you bought a pricey toy only for your cat to play with the packaging instead? Building your own means you're often using materials you already have lying around: old socks, cardboard boxes, fabric scraps. It's recycling with a side of feline fun. Plus, you know exactly what materials are going into the toy, avoiding potentially sketchy plastics or dyes that might not be the best for your furry friend.
- Save money by using existing materials.
- Customize toys to your cat's specific play style.
- Know exactly what materials are in the toy.
- Reduce waste by upcycling household items.
Think about the interaction factor too. A lot of store toys are passive. They just sit there. DIY interactive toys, by their nature, often require *you* to be involved. A wand toy you made from a stick and some feathers? That's instant bonding time. A puzzle feeder crafted from a cardboard box? That engages their brain and strengthens your connection as you supervise. It’s not just about giving them something to bat around; it’s about playing *together*. My cat, Jasper, has zero interest in the expensive laser pointer I bought. But wave a shoelace I tied to a stick? Instant hunter mode activated. Go figure.
Another big win for DIY is the environmental angle. The pet industry generates a ton of waste. By using things you'd otherwise toss – empty paper towel rolls, old t-shirts, bottle caps (make sure they're secured!) – you're giving them a second life and keeping less stuff out of landfills. It feels pretty good to know that your cat's favorite toy isn't contributing to a mountain of plastic waste somewhere. It's a small thing, maybe, but it adds up.
Benefit | DIY Approach | Store-Bought (Often) |
|---|---|---|
Cost | Low (uses scraps) | Can be high |
Customization | High (tailored to cat) | Low (generic) |
Materials | Known & controllable | Can be unknown |
Environmental Impact | Lower (upcycling) | Higher (new materials/packaging) |
Easy DIY Cat Interactive Toys You Can Craft Today

Easy DIY Cat Interactive Toys You Can Craft Today
The Humble Cardboard Box and Paper Bag
Alright, let's start with the absolute basics. You don't need a degree in engineering to make some killerdiy cat interactive toys. Seriously, look no further than your recycling bin. A simple cardboard box is catnip to felines. Cut a few holes in it – different sizes are good – and suddenly you've got a fort, a hiding spot, and a ambush zone all in one. Toss a few crumpled paper balls or bottle caps (securely taped, obviously) inside, and it becomes a puzzle toy. They have to reach in to get the goodies, which taps into their natural hunting instincts. It's ridiculously simple, costs zero dollars, and provides surprising amounts of entertainment.
Paper bags are another winner, though you need to be careful they don't chew and ingest large pieces or get tangled in handles (cut those off!). Lay one on the floor, and most cats can't resist exploring the crinkly, mysterious cave. Wiggle your fingers under the bag from the outside, and it's instant prey. My cat, Penny, is obsessed with paper bags. She'll stalk them, pounce on them, and then just sit inside like she's contemplating the mysteries of the universe. It's pure, unadulterated, cheap fun.
- Cardboard box: Cut holes for peek-a-boo and pawing.
- Paper bag: Remove handles; use for hiding and crinkle-play.
- Crumpled paper or foil: Simple chase toys.
- Empty toilet paper rolls: Easy to bat around or fill with treats.
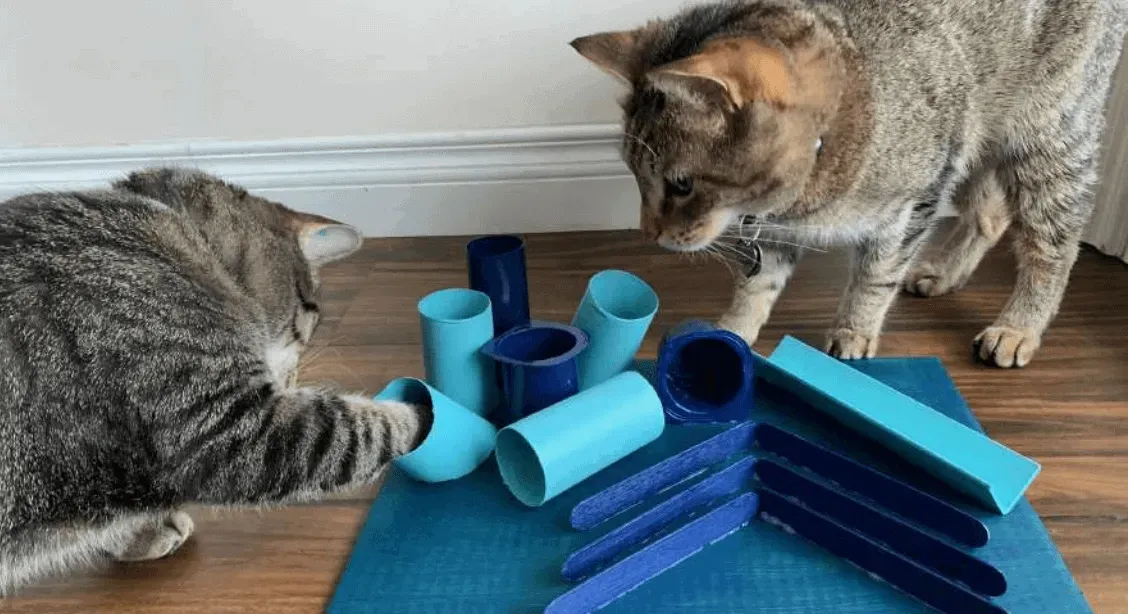
Wand Toys from Household Scraps
Interactive play is crucial for cats, and nothing facilitates it quite like a wand toy. Forget the flimsy store versions that break after three play sessions. You can make a durable one from things you already have. Grab a sturdy stick, a dowel rod, or even just a long, thick piece of wire (with no sharp ends!). Then, attach something enticing to the end. Feathers are a classic, but you can use fabric strips, yarn remnants, or even just a crumpled piece of paper. Secure it well – a bit of hot glue or strong tape works wonders – and you've got a custom fishing pole for your favorite predator.
The beauty of a DIY wand is you control the action. You mimic prey movements – darting, hiding, pausing. This engages their hunting sequence fully, providing great physical exercise and mental stimulation. It's way more satisfying for them than batting a static mouse. My cat, Finn, goes absolutely wild for a wand I made with some old ribbon and a bottle cork. He'll leap, twist, and chase it until he's panting, then collapse in a happy heap. That kind of active play is essential for keeping indoor cats healthy and happy, reducing boredom-induced mischief.
Simple Fabric and Sock Creations
Got old socks with no matches? Don't toss them. They are prime material for easydiy cat interactive toys. Stuff a sock with more socks, some fabric scraps, or even dried beans (make sure it's sealed TIGHT so no beans escape!). Tie off the end securely. You've made a kickeroo toy they can grab with their front paws and bunny-kick with their back ones. Add a pinch of catnip inside before stuffing for extra allure. This satisfies their instinct to wrestle and "kill" prey.
Small fabric scraps can be tied into knots or braids to create simple chew toys. Just make sure the fabric isn't fraying into long strings that could be ingested. You can also cut fabric into strips and tie them onto a ring (like from an old milk jug handle, again, secure and large enough not to swallow) to create a dangling, tactile toy. These are great for batting, carrying, and generally abusing, which is apparently a cat's idea of a good time. They might look like nothing special to you, but to a cat, they're potential fun waiting to happen.
What's the most unexpected household item your cat has turned into a toy?
NextLevel Fun: More Involved DIY Cat Interactive Toys
NextLevel Fun: More Involved DIY Cat Interactive Toys
Crafting a Cardboard Castle of Fun
so you've mastered the basic box and sock toys. Ready to level up yourdiy cat interactive toysgame? Let's talk cardboard engineering. Instead of just one box, gather a few different sizes. You can create multi-level structures, connect boxes with tunnels (cut circular holes and tape them together), and add varying entrance and exit points. Think less 'box' and more 'cat condo on a budget'. Cut out windows for peek-a-boo, add scratching surfaces by taping rough cardboard scraps inside, and create platforms. You can even hang toys inside from the top flap.
This type of project takes a bit more planning and tape (seriously, you'll need lots of strong packing tape), but the result is a dynamic play space that encourages climbing, exploring, and hiding. It taps into their natural instincts to seek high places and enclosed spaces. My friend built one of these for her two cats, a sprawling metropolis of cardboard. They spent the next month treating it like their personal jungle gym, ignoring the expensive cat tree she’d bought them previously. The key is sturdy construction so it doesn't collapse mid-pounce.
- Gather various box sizes.
- Plan the layout: tunnels, levels, openings.
- Securely tape all connections and edges.
- Add features like windows, scratching surfaces, or hanging points.
Building a Simple Puzzle Feeder
Mental stimulation is just as important as physical activity for a happy cat, especially for indoor cats. A great way to provide this is through puzzle feeders, and you can make effective ones yourself. A basic version involves taking a clean plastic bottle or a paper towel roll and cutting several holes around the sides, just large enough for kibble or small treats to fall out when batted or rolled. Secure the ends of the paper towel roll or ensure the bottle cap is on tight.
A slightly more complexdiy cat interactive toyspuzzle feeder can be made from a shallow cardboard box or a plastic tray. Glue or tape various obstacles inside – toilet paper rolls cut into smaller rings, small plastic cups (secured!), or even just lumps of crumpled paper. Place kibble or treats among these obstacles. Your cat has to use their paws and nose to figure out how to get the food out, slowing down their eating and engaging their brain. It's a win-win, unless your cat is a genius and solves it in ten seconds, in which case, back to the drawing board.
Crafting a Durable Wand or Teaser
We covered simple wands, but you can make more robust versions that stand up to serious abuse. Instead of a thin stick, use a thicker dowel rod or even a section of PVC pipe (sanded smooth, no sharp edges!). For the 'lure', think sturdy materials. Strips of fleece fabric, braided yarn (thick strands, tightly braided to prevent unraveling), or even sections of old leather belts work well. Attach the lure securely with strong cord, wire, or heavy-duty zip ties, then cover any sharp attachment points with tape or fabric.
Adding different textures or sounds can increase engagement. Tie on a few large wooden beads (too big to swallow!) or knot fabric strips at intervals. The weight and durability of a more substantial wand allow for more vigorous play sessions. You can drag it, flick it, and let your cat really go after it without fear of it disintegrating instantly. Just remember to put wand toys away when not in use, as the string or attachments can be a hazard if chewed unsupervised.
Keeping It Safe: Checking and Refreshing Your DIY Cat Toys

Keeping It Safe: Checking and Refreshing Your DIY Cat Toys
The Never-Ending Safety Check
you've whipped up some fantasticdiy cat interactive toys, and your furry friend is having a blast. Great! But your job isn't done once the crafting glue dries. These aren't indestructible artifacts destined for a museum. They're going to get chewed, clawed, kicked, and generally abused. This means you need to become the chief safety inspector of your cat's playpen. Before every play session, or at least daily if toys are left out, give them a good once-over. Look for frayed strings that could unravel and be swallowed. Check for small pieces coming loose – buttons, beads, feathers, anything that wasn't secured with the strength of a thousand suns. Are there sharp edges appearing on cardboard? Is the fabric tearing to reveal stuffing? Assume your cat is actively trying to dismantle the toy and ingest its components.
Knowing When to Retire or Refresh
Just like that favorite pair of socks with more holes than fabric, some DIY toys reach the end of their useful life. A toy that's heavily damaged isn't just less fun; it's a potential hazard. If you spot significant wear and tear – major fraying, loose small parts, structural breakdown (R.I.P. cardboard fort) – it's time to either repair it or, more likely, toss it. Don't feel bad; its sacrifice fueled hours of feline joy. For fabric toys, a run through the washing machine (check materials first!) can refresh them and get rid of that mystery cat funk. Cardboard creations are usually single-use or short-term heroes; once they start looking like abstract modern art, they're done. Making new ones is half the fun anyway.
- Inspect toys daily for damage.
- Look for fraying strings, loose small parts, or sharp edges.
- Remove any toy that is significantly damaged.
- Wash fabric toys when needed (if materials allow).
- Consider cardboard toys as temporary fun; replace when worn.
Wrapping Up Your DIY Cat Adventure
So there you have it. You don't need a degree in engineering or a bottomless budget to keep your cat entertained and engaged. We've covered why making your own toys makes sense, from saving cash to providing tailored fun. We’ve also armed you with a few ideas, from the ridiculously simple to the slightly more ambitious. Remember, the goal isn't perfection; it's providing stimulation and strengthening that bond. Keep an eye on the toys, repair or replace as needed, and enjoy the show. Your cat might not give you a glowing Yelp review, but a happy purr and a few less attacks on your curtains should be reward enough.