Table of Contents
Let's be honest, your cat probably has a graveyard of abandoned toys under the sofa. You spend good money on that fancy feather wand or that squeaky mouse, and within days, it's either shredded beyond recognition or completely ignored. It feels like a losing battle sometimes, doesn't it? But what if you could make toys your feline overlord might actually *love*? And what if it didn't cost you an arm and a leg?
Why Bother with Homemade Cat Toys Anyway?
Why Bother with Homemade Cat Toys Anyway?
Let's face it, those cute little mice and crinkle balls from the pet store rarely survive more than a few supervised play sessions, let alone unsupervised attacks under the bed. They fray, they fall apart, and sometimes they just disappear into the abyss of your living room. It feels like throwing money away, doesn't it? Making your own cat toys, especially using readily available resources like free crochet cat toy patterns, gives you control. You pick the materials, ensure they're sturdy, and create something unique that might actually stand up to your cat's relentless enthusiasm. Plus, there's a certain satisfaction in watching your cat bat around something you made with your own hands, even if they still occasionally prefer the cardboard box the toy came in.
Stocking Up: Supplies for Your Crochet Cat Toy Projects
Stocking Up: Supplies for Your Crochet Cat Toy Projects
Choosing Your Yarn Wisely
Alright, let's talk yarn. This isn't the time for that super-fuzzy, shed-prone stuff. Cats chew, they claw, they ingest things they shouldn't. You need something durable and, ideally, natural fiber. Cotton is a solid choice. It's strong, washable, and less likely to cause issues if your cat accidentally swallows a tiny bit. Acrylic can work too, but look for something tightly spun and avoid anything with mohair or excessive fuzz. Think sturdy, not fluffy. The goal is a toy that holds its shape and doesn't disintegrate into a kitty snack.
Hooks and Other Essentials
Beyond the yarn, you'll need a crochet hook. The size depends on your yarn weight and how tight you want your stitches. For cat toys, a smaller hook than the yarn label suggests is often better; tighter stitches mean a more durable toy that's harder for claws to unravel. We're aiming for dense fabric, not a lacy shawl. You'll also need a pair of scissors for cutting yarn and a yarn needle (sometimes called a tapestry needle) for weaving in ends securely. Secure ends are non-negotiable; loose ends are choking hazards.
- Sturdy Cotton or Acrylic Yarn
- Crochet Hook (size appropriate for tight stitches)
- Sharp Scissors
- Yarn Needle
- Stuffing (fiberfill or yarn scraps)
- Optional: Catnip, bells, felt scraps
Stuffing and Extras: What to Add (and Avoid)
Now for the fun part: filling the thing. Fiberfill works just fine, but you can also use yarn scraps saved from other projects – a good way to recycle. If you want to add catnip, tuck it deep inside the stuffing before closing the toy. A small bell can add auditory appeal, but make sure it's securely enclosed within the crochet fabric so it can't escape. Avoid small plastic eyes or noses that can be chewed off. If you want features, embroider them or cut shapes from felt and stitch them on *very* securely. Anything that can detach is a potential hazard.
Easy Wins: Simple Free Crochet Cat Toy Patterns

Easy Wins: Simple Free Crochet Cat Toy Patterns
Starting with the Basics: The Crochet Ball
so you've got your yarn and hook, maybe a slight caffeine buzz, and a cat giving you the side-eye, wondering when the entertainment starts. The absolute easiest place to begin with free crochet cat toy patterns is the humble ball. It's just increasing in rounds, then decreasing. No fancy stitches, no complicated shaping. You can make them tight and firm, perfect for batting around, or slightly looser and squishier for carrying. You can make them tiny for kittens or larger for a Maine Coon who thinks they're still a kitten. It's the foundation, the gateway drug to the world of DIY cat toys.
Moving to Tubes and Simple Shapes
Once you've mastered the ball (or decided making perfect spheres is overrated), you can move onto simple tubes or rectangles folded and stitched. These are great for stuffing with crinkle material (like clean plastic packaging) or just plain fiberfill. Think of them as mini-pillows for batting and bunny-kicking. A simple rectangle worked in single crochet can be folded in half, stitched up two sides, stuffed, and then the final side sewn shut. Add some yarn tails on the ends for extra fun. These free crochet cat toy patterns are forgiving and fast.
What's the simplest pattern you've ever tried that your cat actually liked?
Adding Appeal: Catnip and Texture
Even the simplest free crochet cat toy patterns can become instant hits with a little strategic addition. Catnip is the obvious one; tuck a generous pinch deep inside before you close up the toy. Make sure it's distributed so the scent isn't just in one spot. Another trick is varying the texture. Use different yarn weights or hold two strands together for a denser feel. Incorporate simple stitches like puff stitches or bobbles on the surface – they create little nubs that some cats go absolutely wild for. It adds visual and tactile interest without making the pattern overly complex.
Beyond the Basic Ball: Creative Free Crochet Cat Toy Patterns
Beyond the Basic Ball: Creative Free Crochet Cat Toy Patterns
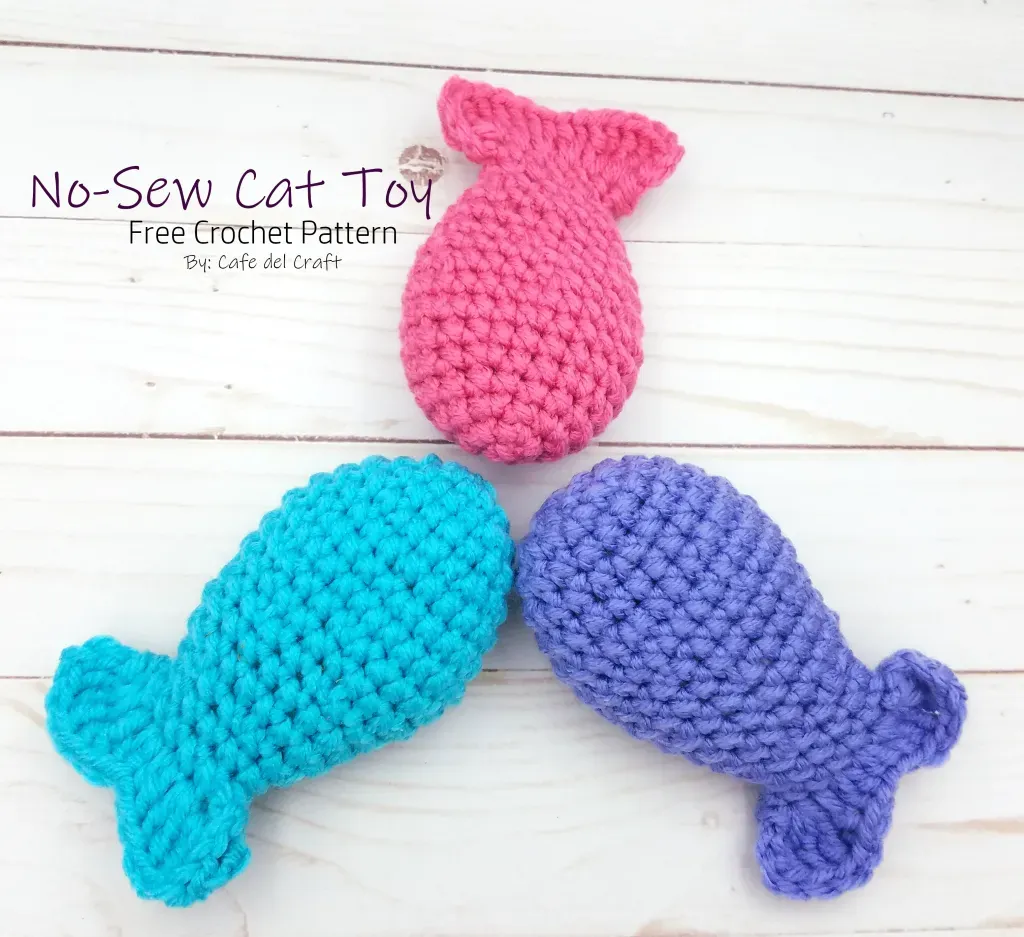
Getting Fancy with Shapes: Fish, Mice, and Birds
Once you've churned out a few dozen balls and maybe a simple tube or two, you might feel the itch to try something a little more recognizable to your cat (and maybe more impressive to your fellow crafters). This is where the fun really begins with free crochet cat toy patterns that mimic actual prey. Think little fish shapes worked in the round, complete with a tiny tail fin. Or maybe a classic mouse shape, starting with a slightly tapered head and a rounder body, perhaps adding some yarn whiskers (stitched on *very* securely, naturally). You can find patterns for simple bird shapes too – often just a body and maybe some little wings or tail feathers worked separately and attached firmly. These projects might involve a few more steps or different stitch counts, but they're still totally manageable for anyone comfortable with basic crochet stitches.
Adding Interactive Elements: Danglers and Ring Toys
Moving past static shapes opens up a whole new world of engagement for your cat. Why just make a toy when you can make a *game*? Look for free crochet cat toy patterns that incorporate rings for batting or holes for paws to hook into. You can crochet simple rings or cover existing plastic rings (like those from milk jugs, cleaned thoroughly) with crochet. Attaching crochet shapes to a sturdy, short length of braided yarn or cotton cord creates a fantastic dangler – just make sure the cord is thick and short enough to prevent tangling hazards when unsupervised. Some patterns even incorporate internal structures or different textures within the same toy, like a rattle insert (check it's safe and enclosed!) or a section worked in a different stitch pattern for variety. It's about creating something that triggers their natural hunting instincts.
What kind of toy does your cat go absolutely bonkers for?
Safety First: Making Durable Crochet Cat Toy Patterns
Safety First: Making Durable Crochet Cat Toy Patterns
Choosing the Right Stuff (and Stitch)
Look, making a cute little crocheted mouse from a free crochet cat toy pattern is great, but if it falls apart faster than a cheap suit in a hurricane, you've just created a potential choking hazard. Durability starts with your materials and your technique. We talked about yarn choice earlier – cotton or tight-spun acrylic is your friend. But equally important is your tension. You know how some crochet projects are loose and drapey? That's the opposite of what you want here. Aim for tight, dense stitches. You should barely be able to see through the fabric. This makes it much harder for claws and teeth to pull out individual loops of yarn. Consider using a smaller hook size than the yarn label suggests to achieve this bulletproof fabric.
Securing Everything (and Not Adding Junk)
This is arguably the most critical step when working with any free crochet cat toy patterns. Those yarn tails? They need to be woven in *multiple* directions through the inside of the toy, not just once or twice. Don't rely on a single knot. Weave them back and forth, snip the end, and give it a little tug. If it comes out, you haven't done enough. Small plastic eyes, buttons, or bells attached on the *outside* are a hard no. Cats are surprisingly good at prying things off with their teeth. If you want eyes, embroider them securely with sturdy thread. If you want noise, put a bell *inside* the toy before stuffing and sealing it, making sure it can't poke through the stitches. Anything that can be chewed off and swallowed is a risk you don't need to take.
- Use sturdy, natural fiber yarn (cotton is great).
- Crochet with tight tension; use a smaller hook if needed.
- Weave in yarn ends multiple times in different directions.
- Avoid external plastic eyes, buttons, or small embellishments.
- If adding a bell, place it securely *inside* the toy.
- Regularly inspect finished toys for wear and tear.
The Final Yarn on Crochet Cat Toys
So there you have it. Stepping into the world of free crochet cat toy patterns doesn't require a massive investment or advanced crafting degrees. With a little yarn, a hook, and some patience, you can bypass the overpriced, quickly-destroyed store-bought options. You've seen how simple stitches can become a beloved kicker toy or a chase-worthy mouse, and how a bit more effort yields something truly unique. Remember to keep safety paramount – nobody wants a trip to the vet over a swallowed eye. Your cat's approval isn't guaranteed, because, well, they're cats. But the satisfaction of creating something with your own hands, something they *might* actually play with for more than five minutes? That’s a win in my book.