Table of Contents
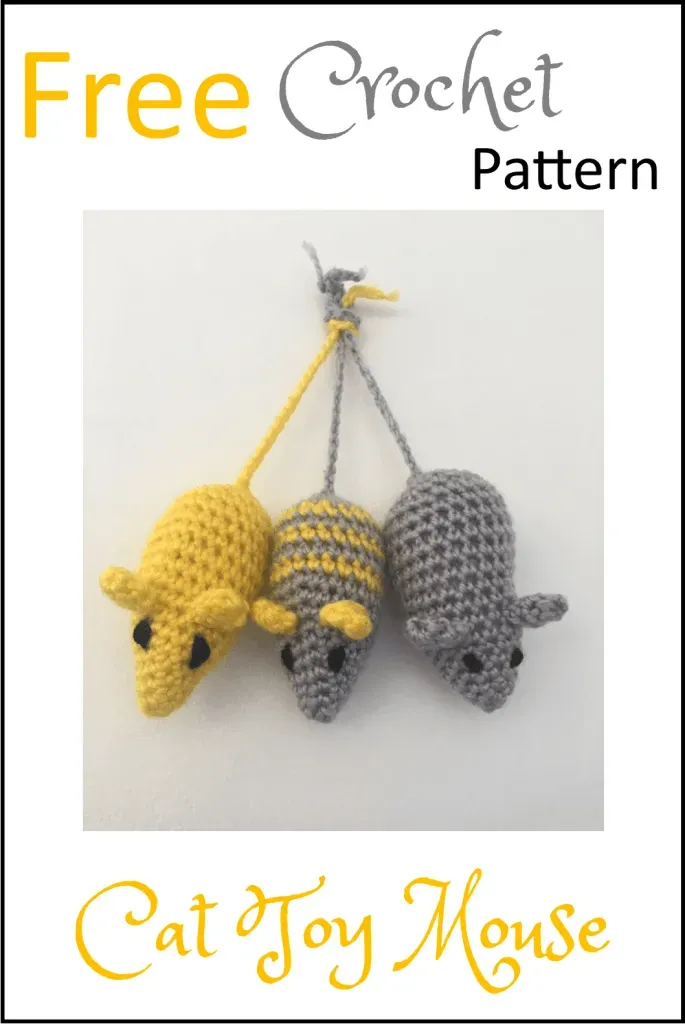
Let's be honest, your cat probably has a drawer full of expensive, store-bought toys they ignore in favor of a dust bunny or a stray bottle cap. It’s a universal feline truth. But what if you could craft something they'd actually chase, pounce on, and maybe even carry around like a prized trophy? Something simple, satisfying to make, and importantly, free?
Why Your Cat Needs a Crochet Mouse Toy
Why Your Cat Needs a Crochet Mouse Toy
Tapping into Their Inner Hunter
Look, your cat isn't just a fluffy couch ornament, even if they spend 90% of their day perfecting the art of napping. Deep down, they're tiny predators. They have instincts – the stalk, the pounce, the kill shake (usually of a toy, thankfully). A good mouse toy, especially one with a bit of weight and texture like a crochet one, triggers those natural behaviors. It's not just play; it's essential enrichment. They get to practice those ancient skills, which keeps them physically active and mentally stimulated. It’s way more engaging than batting at a laser pointer dot that they can never actually catch.
Think about the difference between a mass-produced plastic ball and something handmade. Your cat interacts with the world through their senses. A crochet mouse has texture, it can be stuffed with something enticing like catnip, and it's sized just right for carrying around. Plus, you know exactly what's in it. No weird chemicals or tiny plastic bits that could break off and become a hazard. Making a crochet mouse cat toy means you're providing a safe, engaging outlet for their predatory drive, offering something truly beneficial for their well-being.
- Satisfies natural hunting instincts
- Provides physical exercise
- Offers mental stimulation
- Safer than many store-bought options
- Can be customized with catnip
Gathering Your Supplies for the Free Crochet Mouse Cat Toy Pattern
Gathering Your Supplies for the Free Crochet Mouse Cat Toy Pattern
Picking the Right Yarn: Not All String is Equal
Alright, so you're ready to make some tiny rodent replicas for your overlord. First things first, yarn. This isn't the time for that super fuzzy, delicate stuff you use for baby blankets. Your cat is going to bite, claw, and potentially slobber on this. You need something durable. Cotton yarn is a solid choice. It's sturdy, doesn't stretch out easily, and most importantly, it holds up to abuse. Acrylic can work too, but make sure it's a tighter spun kind. Avoid anything too fluffy or loosely spun, as tiny fibers can come loose and end up in your cat's tummy. We're aiming for "beloved toy," not "hairball factory."
Hooks, Needles, and Notions: The Tools of the Trade
Beyond the yarn, you'll need your trusty crochet hook. The pattern usually specifies a size, but typically a smaller hook (think 3.0mm to 4.0mm) is best for cat toys. This creates a tighter fabric, making it more durable and less likely to snag or fall apart under vigorous play. You'll also need a yarn needle for weaving in ends and maybe stitching on ears if the pattern requires it. Small scissors are essential for snipping yarn. A stitch marker is super helpful if you're working in continuous rounds, which most amigurumi (stuffed toy) patterns do. It saves you from losing your place and having to frog (rip out) your work – nobody enjoys that.
- Crochet Hook (size specified in pattern, often 3.0mm-4.0mm)
- Yarn Needle
- Small Scissors
- Stitch Marker (optional but recommended)
Stuffing and the Secret Ingredient: Catnip!
Now for the guts of the operation – the stuffing. Standard polyester fiberfill works perfectly. You want to stuff it firmly but not so tight that it's rock hard. A slightly squishy mouse is much more appealing for a cat to bite and carry. And here's where you can really make it irresistible: catnip. Sprinkle some dried catnip in with the fiberfill as you stuff. A little goes a long way, and it turns a simple toy into a feline rave. Just make sure the toy is securely closed so the stuffing and catnip don't escape. Some patterns might call for safety eyes, but honestly, for a cat toy, it's safer to embroider eyes with yarn or just leave them off entirely to avoid a choking hazard. Your cat doesn't care if the mouse has perfect little eyes; they care about the chase and the catnip.
Following the Free Crochet Mouse Cat Toy Pattern: StepbyStep

Following the Free Crochet Mouse Cat Toy Pattern: StepbyStep
Getting Started with the Pattern
so you've got your yarn and hook ready, maybe even a little pile of catnip waiting. Now comes the fun part: actually following the **free crochet mouse cat toy pattern**. Don't sweat it if you're not a seasoned pro; most of these patterns are designed for beginners or those with just a little crochet under their belt. They usually start with a magic ring (which sounds fancy but is just a way to get a tight center) and then build the mouse body in continuous rounds using simple single crochet stitches. You'll increase stitches to make the wider body, then decrease to form the nose, and maybe add a few rows for ears and a tail. The beauty is in the repetition – once you get the hang of the stitch pattern, it flies by.
Stuffing and Finishing Your Crochet Mouse Cat Toy
Stuffing and Finishing Your Crochet Mouse Cat Toy
Getting the Stuffing Just Right
you've got the body of your little mouse crocheted. Now for the slightly messy but crucial part: stuffing it. Don't just jam the fiberfill in there like you're packing a suitcase for a month-long trip. You want it firm enough to hold its shape but still soft enough for your cat to sink their teeth and claws into. Use small pieces of stuffing and push them in bit by bit with your finger or the back of your crochet hook. Pay attention to the nose area – make sure it's filled out so it has a nice, defined point. A floppy nose is just sad.
Adding the Magic (Catnip, Obviously)
This is where the real fun happens, at least from your cat's perspective. Before you completely close up the mouse, sprinkle a generous pinch of dried catnip in with the fiberfill. Mix it in a bit so it's dispersed throughout the toy. If you have a particularly enthusiastic catnip connoisseur, you can even put the catnip inside a small piece of fabric or a tiny mesh bag before putting it in the mouse to keep it from poking through the stitches, though a tight crochet fabric usually prevents this. Just don't overdo it; you're making a toy, not a feline drug lord's stash.
- Use small bits of fiberfill
- Stuff firmly, but not rock hard
- Ensure the nose is well-stuffed
- Sprinkle dried catnip inside
- Mix catnip throughout the stuffing
Closing Up and Adding Details
Once your mouse is stuffed to your liking and has its dose of the good stuff, it's time to close that sucker up. Most patterns will have you decrease stitches until the opening is small, then cut the yarn, leave a tail, and use your yarn needle to weave the tail through the remaining stitches and pull tight to cinch it closed. Weave in that end securely! You don't want your cat unraveling your hard work. Now's also the time to add any extras, like crocheted ears stitched onto the head or a simple chain stitch tail. Keep it simple for durability – a long, floppy tail is often a favorite.
Customizing Your Free Crochet Mouse Cat Toy Pattern
Customizing Your Free Crochet Mouse Cat Toy Pattern
Playing with Color and Size
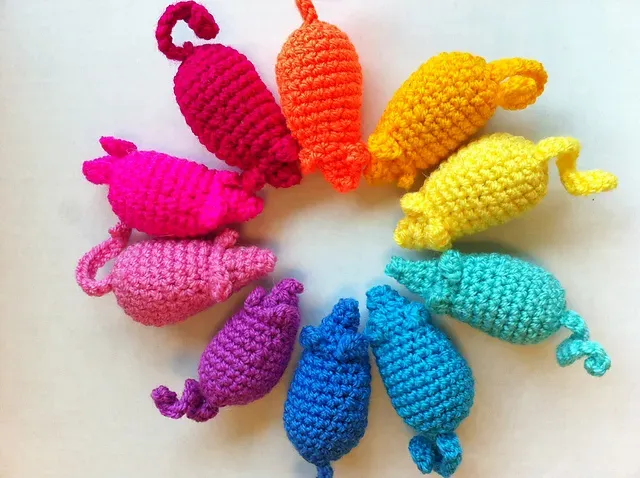
So you've mastered the basic **free crochet mouse cat toy pattern**? Great. Now let's talk about making it yours, or more importantly, making it irresistible to *your* particular furball. The simplest way to customize is by changing the yarn color. Does your cat have a favorite color? (Mine seems to prefer anything that blends into the carpet so he can 'lose' it and then 'find' it dramatically). Use scraps you have lying around. Different colors make the toys distinct, which is handy if you're making a whole litter of mice. You can also change the size by using a different yarn weight and corresponding hook size. A chunkier yarn and bigger hook make a larger mouse, perfect for a bigger cat or one who likes to really wrestle. A finer yarn and smaller hook create a tiny mouse, ideal for kittens or cats who prefer smaller prey.
Adding Textures and Sounds
Beyond just the basic crochet fabric, think about adding other textures. You could crochet a little bumpy shell to sew onto the body, or even incorporate a few rows of a different stitch like bobble stitch for added interest. Cats love things that crinkle or rattle. Before you fully stuff and close the mouse, slip in a tiny bell or a piece of crinkly plastic (like from a clean bread bag). Just make absolutely sure it's fully encased within the stuffing and the crochet fabric, and that the fabric is tight enough that the cat can't chew through to it. Safety first, always.
- Change yarn color
- Use different yarn weights/hook sizes for size variations
- Incorporate different crochet stitches for texture
- Add a small bell inside for sound
- Include crinkly material (safely secured)
The Catnip Factor and Other Scents
We already talked about adding catnip during stuffing, but you can take this further. Some people like to make a small pouch for the catnip so it's easily refillable later, though this adds a step. You could also experiment with other natural scents cats are drawn to, like valerian root or silvervine, if your cat isn't big on catnip (some aren't, the weirdos). Just a tiny pinch mixed with the fiberfill is usually enough. The goal is to make the mouse smell interesting and rewarding for them to interact with.
Your Cat's New Favorite (For Now)
So there you have it. With a little yarn and some basic crochet skills, you've bypassed the pet store's overpriced, ignored offerings and created a legitimate contender for your cat's attention using a simple free crochet mouse cat toy pattern. You’ve crafted something with your own hands that appeals directly to their predatory instincts. Will they love it forever? Probably not. They're cats. But for today, and maybe tomorrow, this little mouse stands a fighting chance against the allure of that rogue bottle cap under the sofa. Enjoy the fleeting victory.