Table of Contents
You've seen it. You buy your cat a fancy, expensive toy, complete with bells, feathers, and perhaps a microchip that plays soothing whale sounds. Where does the cat spend its time? Ignoring the expensive gadget and instead cramming itself into the shipping box it came in. Or maybe batting around a stray piece of packing paper. It's a tale as old as time, or at least as old as online shopping. Cats have a strange, undeniable pull towards cardboard.
Why Do Cats Even Care About a Cardboard Box?

Why Do Cats Even Care About a Cardboard Box?
So, why the obsession? Why Do Cats Even Care About a Cardboard Box? It seems counterintuitive when you've just blown cash on a plush cat tree. Think like a predator that also happens to be prey. Small, enclosed spaces provide a sense of security. A cardboard box acts like a mini-fortress, a place where they can observe the world without feeling exposed. It taps into their instinct to find cozy, hidden spots for napping and feeling safe from perceived threats (like the vacuum cleaner or the mail carrier). Beyond security, cardboard offers insulation. Cats naturally seek out warm spots, and the corrugated layers trap heat effectively. It's basically a free, disposable heated bed. Plus, the texture is perfect for scratching, a natural behavior that keeps their claws healthy and marks their territory. It's a multi-sensory experience for them – a safe haven, a warm bed, and a scratching post all rolled into one humble package.
Simple Homemade Cardboard Cat Toys You Can Make Today
Simple Homemade Cardboard Cat Toys You Can Make Today
The Classic Cardboard Scratcher and Batting Toy
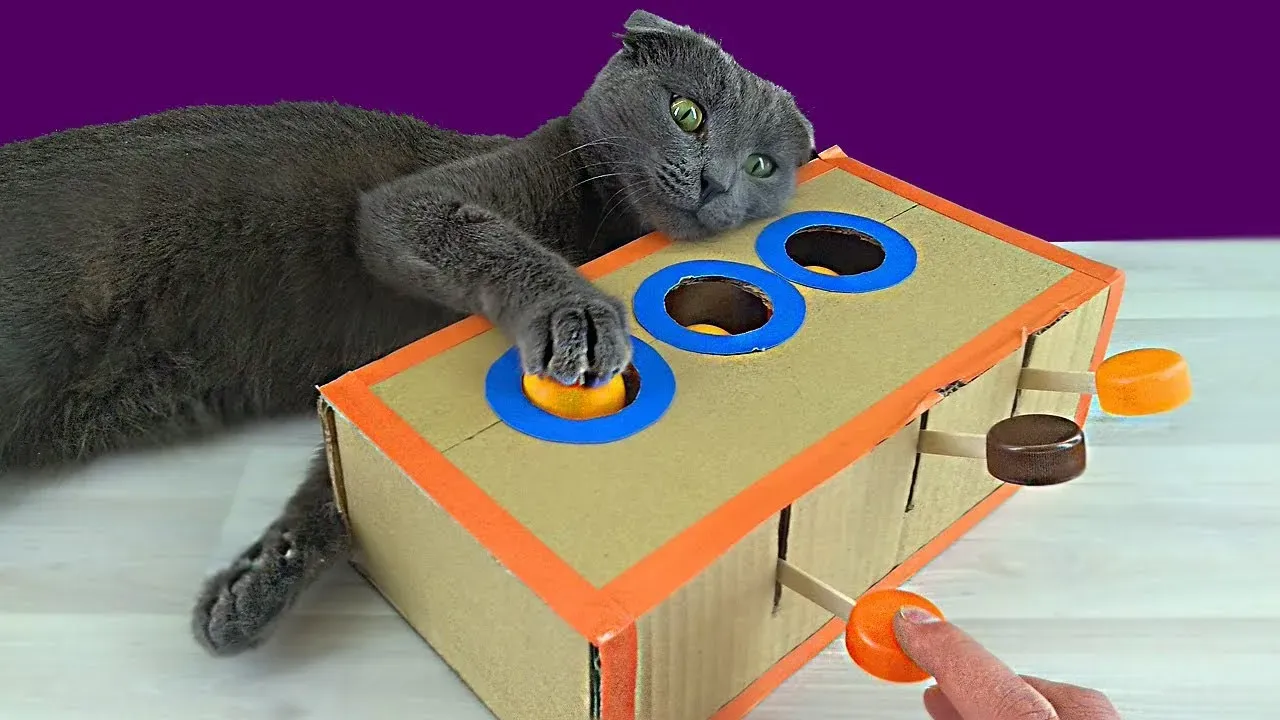
Alright, let's start with the absolute basics. You don't need a workshop or fancy tools to make great homemade cardboard cat toys. The simplest thing you can do is just take a piece of sturdy cardboard – maybe a flap from a box – and offer it up. Cats love scratching it, tearing at it, or just lying on it. To make it slightly more engaging, you can cut a few holes in a small box, just big enough for a paw to fit through. Drop a treat or a small toy inside, and watch them go to town trying to fish it out. This simple setup provides both mental stimulation and physical activity. It's the original puzzle toy, just with less plastic and zero cost.
Rolls, Tubes, and Crinkle Fun
Beyond flat pieces and simple boxes, consider cardboard tubes from paper towels or toilet paper. These make fantastic batting toys. Your cat can chase them, pounce on them, and chew on the ends. Just make sure to remove any stubborn bits of paper or glue. For a bit more fun, you can stuff the ends of a tube with crumpled paper or even a small amount of catnip if your cat responds to it. Another easy win is the cardboard tunnel. Cut the ends off a larger box and lay it on its side, or connect a couple of boxes together. Cats adore running through tunnels, hiding in them, and ambushing imaginary foes. These simple homemade cardboard cat toys tap directly into their playful, predatory nature without costing a dime.
- The Flat Scratch Pad: Just a piece of sturdy cardboard. Simple, effective.
- The Treat Puzzle Box: Small box, a few paw-sized holes, treat inside.
- Cardboard Tubes: Great for batting and chasing.
- The Crinkle Tunnel: Connect boxes for a quick hide-and-seek spot.
Level Up: Building Awesome Homemade Cardboard Cat Castles

Level Up: Building Awesome Homemade Cardboard Cat Castles
Gathering Your Royal Building Materials
so you've mastered the simple stuff. Your cat is batting tubes and hiding in single boxes. Now it's time to think bigger, literally. Building a homemade cardboard cat castle requires a bit more planning than just tossing a box on the floor. You'll need a collection of different-sized boxes – think appliance boxes, moving boxes, maybe even a refrigerator box if you're feeling ambitious and have the space. The sturdier the cardboard, the better. You'll also need a good, sharp utility knife (be careful!), heavy-duty packing tape, and possibly a hot glue gun for extra stability. Don't forget something to mark your cuts, like a pencil. This isn't just throwing boxes together; it's architectural design for felines. Think about the layout – will it be tall and slender, or wide and sprawling? Where will the entry points be? Will there be multiple levels? Sketching a rough plan isn't a bad idea, especially if you have a particular vision (or a particularly demanding cat).
Constructing the Kitty High-Rise
With your materials and plan in hand, start assembling. Use the packing tape generously to join boxes together. Think about creating strong foundations for multiple levels. You can stack boxes, connect them side-by-side, or create tunnels between them. Cut out various sized openings for doors and windows – some just big enough for a head, others large enough to dart through. Consider cutting circular holes, square openings, or even irregular shapes to keep it interesting. Reinforce any seams or stress points with extra tape. For vertical structures, make sure the base is wide and stable so it doesn't topple over during an enthusiastic pounce. A bit of internal bracing with cardboard scraps can help too. Remember, you're building a structure meant to withstand the sudden, chaotic energy of a cat.
- Gather sturdy, varied boxes.
- Stock up on strong packing tape.
- Get a sharp utility knife (adult supervision required!).
- Plan your design – height, width, levels.
- Cut various entry and exit points.
- Reinforce all seams and connections.
- Ensure the base is stable for vertical structures.
Adding the Royal Touches and Safety Checks
Once the main structure is solid, it's time for the fun details. Cut out extra peep holes on upper levels so your cat can survey their kingdom. Add internal ramps or stairs made from folded cardboard if you have multiple floors. You can even create scratching surfaces by taping layers of cardboard together or attaching sisal rope to parts of the structure. Avoid using anything toxic like paint or markers your cat might chew on. Keep it simple and safe. Before presenting the finished masterpiece, do a thorough safety check. Are there any sharp edges from cutting? Is the tape secure? Are there any small pieces that could be chewed off and swallowed? A few minutes of checking can save a lot of worry later. Your cat's new castle is ready for inspection (and likely immediate occupation).
Making Them Last: Safety and Durability Tips for Your Cardboard Creations
Making Them Last: Safety and Durability Tips for Your Cardboard Creations
First, Do No Harm: Essential Safety Checks
Alright, you've built this magnificent structure or crafted some clever little toys. Before you unleash the beast, you gotta play quality control. Think like a cat – what can they chew off, swallow, or get stuck in? Look for any sharp edges where you've cut the cardboard. Smooth them down or cover them with tape. Check that all tape is stuck down firmly; loose tape is a tempting, dangerous snack. If you used any glue, make absolutely sure it's non-toxic when dry and that there are no wet spots. Are any holes too small for your cat to get their head stuck, but too big for them to easily pull it out? Resize them. Remove any staples or metal bits from the original boxes. Your awesome homemade cardboard cat toys are only awesome if they don't end up causing a vet bill.
Building to Withstand the Feline Frenzy
Cats aren't exactly known for their gentle touch, especially when they're in zoomie mode. To make your homemade cardboard cat toys last longer than five minutes, tape is your best friend. And not the cheap stuff. Use heavy-duty packing tape and don't be shy with it. Tape all the seams, inside and out, on boxes and tunnels. For scratchers, taping layers together makes them much more robust. Consider reinforcing high-traffic areas or structural joints with extra layers of cardboard or tape. If you're building a multi-level castle, make sure the connections between boxes are solid enough to handle a flying leap. You're essentially trying to build something that can absorb impact and resist determined clawing and biting. It's a losing battle eventually, but you can certainly extend the playtime.
- Use heavy-duty packing tape generously on all seams.
- Reinforce edges and connections with extra tape or cardboard.
- Consider taping multiple layers for scratch pads.
- Ensure structural joints can handle impact.
- Check tape regularly for loosening.
Maintenance and Knowing When to Retire
Even the most robust homemade cardboard cat toys won't last forever. Cardboard is, by its nature, temporary. Keep an eye on the condition of your creations. If edges become frayed and your cat is eating bits of cardboard, it's time to repair or replace. If a structure becomes wobbly or starts collapsing, it's a safety hazard. Don't wait until it's completely destroyed to take action. Regular inspection is key. Think of it like changing the oil in your car, but less messy and with more purring involved. When a toy has served its purpose and is falling apart, toss it. There's always another delivery box waiting to be transformed.
Cardboard: The Unexpected Cat Paradise
So there you have it. While the pet industry churns out increasingly complex (and expensive) contraptions, your cat might just be happiest with the box they arrived in, or something you quickly fashioned from it. Homemade cardboard cat toys tap into their basic instincts – the urge to hide, to scratch, to pounce on something crinkly. It’s simple, it’s sustainable, and frankly, it’s a little humbling that your carefully chosen designer bed gets ignored for a flattened box. But hey, a happy cat is a happy home, even if their taste runs to the decidedly low-budget.