Table of Contents
Does your cat eye store-bought toys with suspicion, only to shred them into sad, lifeless husks within minutes? Are you tired of shelling out cash for plastic trinkets that end up under the sofa, ignored? You're not alone. Many cat owners face the perpetual quest for the perfect toy – something engaging, durable, and maybe even a little bit special. That's where the magic of homemade catnip toys comes in. Forget flimsy factory-made fluff; crafting your own allows you to tailor playtime specifically for your finicky friend.
Why Make Homemade Catnip Toys for Your Feline?

Why Make Homemade Catnip Toys for Your Feline?
Why Make Homemade Catnip Toys for Your Feline? It’s a question I get asked pretty often, and the answer is surprisingly simple and rewarding. Think about it: store-bought toys can be expensive, you're never quite sure what materials they're made from, and let's face it, cats are notorious for ignoring the pricey ones in favor of a crumpled paper ball. When you make your own, you control everything. You pick the fabric, ensuring it’s something durable and safe, you choose the stuffing (like natural batting instead of synthetic poly-fill if you prefer), and most importantly, you get to use fresh, high-quality catnip. That potent stuff makes a huge difference in how much your cat interacts with the toy. It's like giving them a gourmet meal instead of fast food.
Beyond the practical benefits, there's a real satisfaction in crafting something for your pet. It doesn't need to be fancy; a simple sewn pouch stuffed with catnip is often a feline favorite. It’s also a fantastic way to use up fabric scraps that might otherwise end up in the trash. You can tailor the size and shape to your cat's preferences – maybe a long kicker toy for the bunny-kicking enthusiasts, or a small, soft pouch for the gentle paw-patter. It's a win-win: your cat gets an irresistible new plaything, and you save money while getting a small, satisfying DIY project done.
- You control the safety and quality of materials.
- It's significantly cheaper than buying toys repeatedly.
- You can customize the size and shape for your cat.
- Fresh catnip provides maximum attraction.
- It’s a great way to use up old fabric scraps.
- Creating something for your pet is rewarding.
Simple Methods for Homemade Catnip Toys (Even in 5 Minutes!)
Simple Methods for Homemade Catnip Toys (Even in 5 Minutes!)
No-Sew Wonders: Fabric Scraps and Imagination
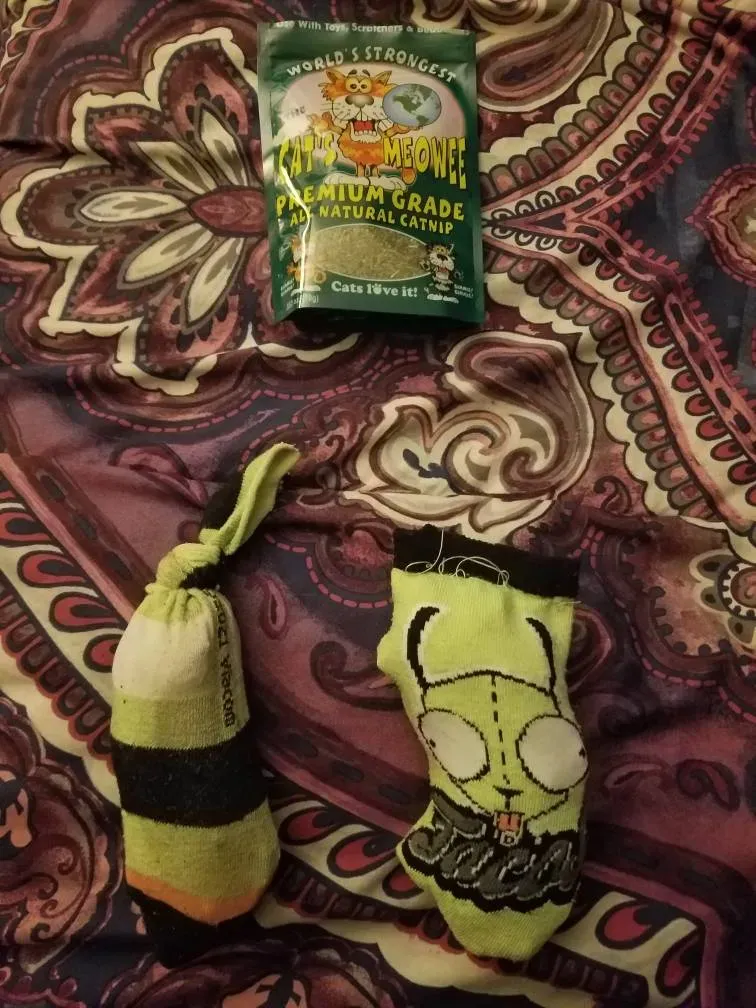
so maybe sewing isn't your jam, or you're just in a serious time crunch. Good news: you don't need a needle and thread to make effective homemade catnip toys. The simplest method involves just fabric scraps and some ingenuity. I once watched my cat become utterly obsessed with a tube sock I simply tied off at both ends after stuffing it with batting and a generous sprinkle of catnip. Zero sewing required. You can use old t-shirts, flannel scraps, or even felt. The key is a material that holds scent well and is relatively durable. Just cut a piece, put some stuffing and catnip in the center, gather the edges, and tie it off tightly with string or a rubber band. It's almost embarrassing how easy it is, and your cat won't judge your lack of stitching skills.
Here are a few no-sew ideas to get you started:
- Tie knots in a fabric strip after adding catnip to the middle.
- Stuff catnip and batting into an old sock and tie off the end.
- Cut two squares of felt, layer catnip and batting between them, and use fabric glue or a strong fabric tape around the edges.
- Wrap catnip and stuffing in a small cloth and secure it tightly with multiple rubber bands.
The 5-Minute Sewn Pouch: Quick and Dirty
If you can manage a straight line with a sewing machine (or even a passable stitch by hand), the five-minute fabric pouch is your go-to for homemade catnip toys. This is the method often highlighted for its speed. You literally need two small squares of fabric – think 3.5 to 4 inches. Place them right sides together, sew around three sides, leaving one open. Flip it right side out, stuff it with batting and catnip, and then sew the final side closed. Done. My first attempt at this was hilariously lopsided, but my cat didn't care. He just immediately started bunny-kicking it into submission. The beauty is in its simplicity and speed, making it perfect for cranking out a batch.
Boosting the Allure: Fresh Catnip is Key
Regardless of the method you choose for your homemade catnip toys, the quality and freshness of the catnip make all the difference. Dried, stale catnip from the back of a cupboard won't have the same intoxicating effect as fresh, potent stuff. If you can, grow your own; it's surprisingly easy and provides an endless supply of the good stuff. If buying, look for organic options stored in airtight containers. You don't need to fill the entire toy with pure catnip (though you could, you lavish spender); a good pinch mixed with batting is usually sufficient to drive most cats wild. Store your extra catnip in the freezer to keep it potent longer.
Catnip Source | Potency Level | Notes |
|---|---|---|
Fresh from plant | High | Most potent, smells amazing. |
Dried (Airtight storage) | Medium to High | Good if stored correctly. |
Dried (Open container) | Low | Likely stale, less effective. |
Gathering Supplies: What You Need for Homemade Catnip Toys
Gathering Supplies: What You Need for Homemade Catnip Toys
so you're ready to dive in and make some homemade catnip toys. Good call. The best part about this little project? You probably have most of what you need scattered around your house already. You don't need a trip to a fancy craft store, just a rummage through your fabric scraps bin (everyone has one, right?), some old batting from a forgotten cushion or pillow, and the star of the show: catnip. If you plan on sewing, a basic needle and thread or a sewing machine will do. Pinking shears are handy for finishing edges, but scissors work too. That's really it. No exotic materials required, just simple stuff you can repurpose.
Stitching Up Fun: StepbyStep Homemade Catnip Toys
Stitching Up Fun: StepbyStep Homemade Catnip Toys
Getting Started: Fabric, Cutting, and First Stitches
Alright, let's get down to the actual making of these homemade catnip toys. Assuming you've embraced the sewing route, even the quick 5-minute version, the first step is picking your fabric. Cotton, flannel, or even felt scraps work beautifully. You're aiming for two pieces, typically squares, maybe 3.5 to 4 inches on each side. Cut them out. Don't stress about perfection; your cat won't pull out a ruler. Place these two squares right sides together. This means the sides you want to show on the finished toy are facing each other. Now, grab your needle and thread or fire up that sewing machine. You're going to sew a straight line down one side, pivot at the corner, sew the next side, pivot again, and sew the third side. Leave one side completely open. This gap is crucial.
Stuffing and Sealing the Deal
With three sides stitched, turn your fabric pouch right side out through the open side. Poke out the corners with a dull pencil or chopstick if you're feeling fancy, though again, your cat likely doesn't care about crisp corners. Now for the good stuff: the filling. Mix a decent pinch or two of fresh catnip with some batting or fiberfill. Don't overstuff it; you want it to be squishy and throwable, not a rock. I find using a small paper funnel helps get the catnip mess contained. Once it's filled to your liking, it's time to close the gap. Fold the raw edges of the opening inward, lining them up with your existing seam. Sew this final side shut as close to the edge as you can. A second pass over this last seam adds a bit more security, which is wise if your cat is a determined destroyer of soft things. Trim any long threads, and maybe run some pinking shears around the edges if you want to minimize fraying and add a touch of... well, something.
- Choose fabric: Cotton, flannel, or felt squares (approx. 3.5-4 inches).
- Cut two identical pieces.
- Place right sides together.
- Sew three sides, leaving one open.
- Turn right side out.
- Mix catnip with batting and stuff the toy.
- Fold in raw edges of the opening.
- Sew the final side closed.
- Optional: Sew a second seam for durability.
- Optional: Trim edges with pinking shears.
Beyond the Basic: Variations and Tips for Your DIY Catnip Creations
Beyond the Basic: Variations and Tips for Your DIY Catnip Creations
Once you've mastered the basic pouch, you might start thinking, "What else can I do with these homemade catnip toys?" The possibilities are pretty open, limited mostly by your fabric stash and tolerance for cat-induced chaos. You could make longer, thinner tubes for cats who love to grip and kick with their back feet. Think a catnip-filled sausage roll, but less greasy and more likely to end up under the fridge. Or try different shapes – fish, mice, or even just random blobs. My cat, Mittens, is particularly fond of a wonky, star-shaped one I made during a moment of questionable crafting ambition; it’s proof that perfection isn't the goal, just something interesting for them to bat around. Consider adding crinkle material inside (like from a snack bag, carefully cleaned) or a small bell securely sewn into a pocket for extra sensory stimulation, assuming your cat isn't terrified of noise. Just make sure anything you add is firmly attached and won't become a choking hazard. The point is, get creative. Your cat probably isn't reviewing your stitch tension.
- Experiment with different shapes: tubes, fish, random blobs.
- Add crinkle material (clean plastic) for sound.
- Securely sew in a small bell for auditory interest.
- Create kicker toys using longer shapes.
- Use different fabric textures for variety.
Homemade Catnip Toys: Happy Cat, Happy Life (and Wallet)
So there you have it. Ditching the pet store aisle for some fabric scraps and dried leaves might just be the best decision you make for your cat's entertainment and your budget. Making homemade catnip toys isn't rocket science; it's a practical way to provide stimulating play tailored to your cat's preferences. You've seen how simple materials transform into coveted treasures and how a few minutes can yield hours of batting, chasing, and blissed-out rolling. Your cat gets a fresh, potent toy, you get the satisfaction of creating it, and your wallet gets a break. Now go forth and craft some feline happiness.