Table of Contents
Want to make your feline friend the happiest cat on the block? Learning how to crochet a mouse cat toy is the perfect way to do it! Not only is it a fun and rewarding craft project, but it also results in a delightful, safe, and engaging toy for your kitty. This article will guide you through each step of the process, from gathering your materials to adding the final touches, ensuring that even beginners can create a charming crochet mouse. We'll start with a list of essential supplies, then move on to detailed instructions for crocheting the mouse's body, ears, and tail. You'll learn how to assemble the toy, stuff it for optimal play, and add those all-important finishing touches that will make it irresistible to your cat. Finally, we'll explore some creative variations to personalize your crochet mouse and make it truly unique. So grab your hook and yarn, and let's get started on this purr-fect project!
Materials You'll Need to Crochet a Mouse Cat Toy
Materials You'll Need to Crochet a Mouse Cat Toy
Yarn Selection: The Foundation of Your Toy
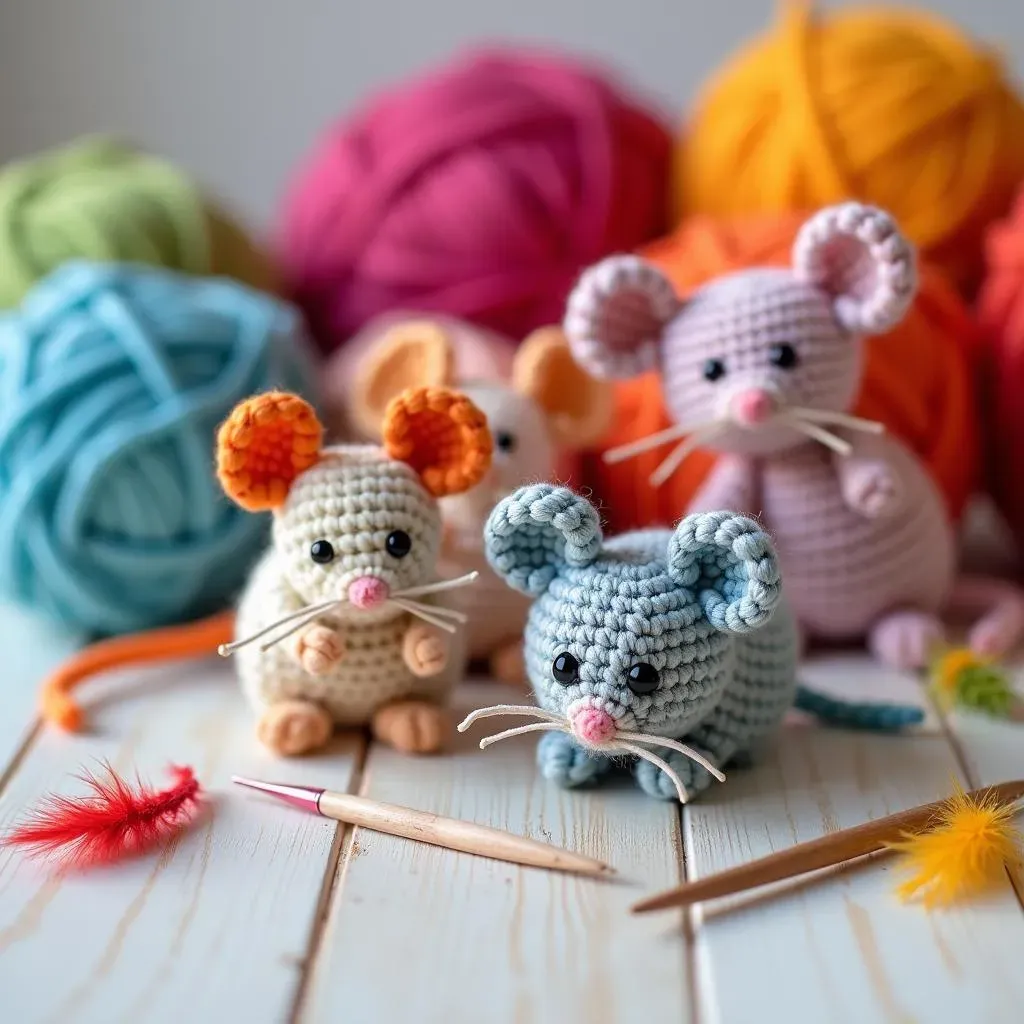
Choosing the right yarn is crucial for creating a safe and appealing toy. Opt for soft, durable yarn like cotton or acrylic. These materials are gentle on your cat's paws and can withstand plenty of playtime. Avoid yarns with long loops or embellishments that could be a choking hazard. I always recommend using leftover yarn from other projects; it's a great way to reduce waste and add a personal touch to your creation!
Consider using different colors to make your mouse more visually stimulating for your cat. Earthy tones like gray and brown are classic choices, but don't be afraid to experiment with brighter hues like blues and greens to catch their eye. Remember, a visually appealing toy is more likely to capture your cat's attention and keep them entertained.
Hooking Up: Choosing the Right Crochet Hook
Selecting the appropriate crochet hook size is essential for achieving the desired stitch density and overall size of your mouse. A 3.5mm (E/4) or 4.0mm (G/6) hook typically works well with DK or worsted weight yarn, but it's always a good idea to check the yarn label for recommendations. Using a hook that's too small will result in a stiff, dense fabric, while a hook that's too large will create a loose, floppy toy.
Experiment with different hook sizes to see what works best for your yarn and tension. Remember, consistency is key when crocheting, so try to maintain a steady tension throughout the project to ensure a uniform appearance. If you're new to crocheting, start with a larger hook size, as it's often easier to see and control the stitches.
Essential Extras: Stuffing, Scissors, and More
Beyond yarn and a hook, you'll need a few other essential supplies to complete your crochet mouse cat toy. Fiberfill stuffing is crucial for giving your mouse its plump, cuddly shape. Opt for hypoallergenic stuffing to minimize the risk of allergic reactions in your cat. You'll also need a pair of sharp scissors for trimming yarn ends and a yarn needle for weaving in those ends securely.
For added fun, consider including a small bell or some catnip inside the mouse before stuffing it. The bell will provide auditory stimulation, while the catnip will appeal to your cat's sense of smell, making the toy even more enticing. Just be sure to secure the bell tightly to prevent it from becoming a choking hazard.
Item | Description | Why You Need It |
|---|---|---|
Yarn | Soft, durable cotton or acrylic | Forms the body of the mouse |
Crochet Hook | 3.5mm (E/4) or 4.0mm (G/6) | Creates the stitches |
Fiberfill Stuffing | Hypoallergenic polyester fiber | Gives the mouse its shape |
Scissors | Sharp scissors | Trims yarn ends |
Yarn Needle | Blunt needle with a large eye | Weaves in yarn ends |
Bell/Catnip (Optional) | Small bell or dried catnip | Adds extra stimulation |
StepbyStep Guide: Crocheting the Mouse Body
StepbyStep Guide: Crocheting the Mouse Body
Getting Started: The Magic Ring
The foundation of our crochet mouse is the magic ring (also known as the magic circle). This technique allows you to create a tightly closed center, preventing stuffing from escaping and giving your mouse a neat, professional finish. To create a magic ring, wrap the yarn around your fingers, slip stitch to secure, and then crochet the first round of stitches into the ring. Don't worry if it seems tricky at first; with a little practice, you'll be creating magic rings like a pro!
For the first round, we'll typically work 6 single crochet stitches into the magic ring. Once you've completed the round, pull the tail of the yarn tightly to close the ring. This will form a small, compact circle that will serve as the base of your mouse's body. It is important to count your stitches as you go to ensure you have the correct number, as this will affect the overall shape and size of your mouse.
Building the Body: Increasing Rounds
Now that we have our magic ring, it's time to start building the body of the mouse. This is achieved by working increasing rounds, which means adding stitches in each round to gradually expand the circle. The most common way to increase is to work two single crochet stitches into the same stitch, effectively doubling the stitch count. The increases should be evenly distributed around the circle to maintain a smooth, round shape.
For example, in the second round, you might work two single crochet stitches into each stitch around, resulting in 12 stitches. In the third round, you might alternate between one single crochet and two single crochet stitches, resulting in 18 stitches. Continue increasing in this manner, following a pattern that adds 6 stitches in each round, until you reach the desired size for your mouse's body. Remember to count your stitches after each round to ensure accuracy.
Round | Stitch Pattern | Total Stitches |
|---|---|---|
1 | 6 single crochet into magic ring | 6 |
2 | 2 single crochet in each stitch | 12 |
3 | *1 single crochet, 2 single crochet in next stitch* repeat around | 18 |
4 | *1 single crochet in next 2 stitches, 2 single crochet in next stitch* repeat around | 24 |
Shaping the Mouse: Decreasing and Closing
Once your mouse's body reaches the desired size, it's time to start shaping it by working decreasing rounds. Decreasing involves reducing the number of stitches in each round, which will create a more rounded, tapered shape for the mouse's head. The most common way to decrease is to work two stitches together as one, effectively merging them into a single stitch.
To decrease, insert your hook into the first stitch, yarn over, and pull through a loop. Then, insert your hook into the next stitch, yarn over, and pull through a loop. You should now have three loops on your hook. Yarn over again and pull through all three loops, completing the decrease. Repeat this process evenly around the circle, decreasing by the same amount in each round. As you decrease, begin stuffing the mouse firmly with fiberfill. Continue decreasing and stuffing until only a small opening remains. Finally, fasten off the yarn, leaving a long tail, and use the yarn needle to weave the tail through the remaining stitches, pulling them tightly to close the opening completely. Secure the end by knotting the yarn and weaving in the tail.
Adding Character: Crocheting the Ears and Tail
Adding Character: Crocheting the Ears and Tail
Tiny Triangles: Crocheting the Ears
Now, let's give our mouse some personality with those adorable little ears! Crocheting the ears is a breeze, and they add so much to the overall charm of the toy. We'll be working in small rounds or rows to create two identical triangular shapes. Using the same yarn as the body, start with a magic ring or a chain of 2, depending on your preference. Then, work a series of single crochet stitches, decreasing in each row to create a pointed tip. The size of the ears is totally up to you, but generally, a base of around 4-5 stitches works well.
Once you've crocheted both ears, it's time to attach them to the body. Position them symmetrically on either side of the mouse's head, using your yarn needle to sew them securely in place. For a more playful look, try folding the base of the ear slightly before attaching it, giving them a perky, upright appearance. Don't be afraid to experiment with different placements and angles to find the perfect look for your crochet mouse!
Wiggly Wonder: Crocheting the Tail
No mouse is complete without a tail, and our crochet mouse is no exception! The tail is super simple to crochet, consisting of a long chain of single crochet stitches. The length of the tail is a matter of personal preference, but a good rule of thumb is to make it roughly the same length as the mouse's body. This will give your cat something to grab and bat around as they play.
To crochet the tail, simply chain the desired number of stitches, then work a single crochet stitch into each chain stitch back to the beginning. Fasten off the yarn, leaving a long tail for attaching it to the body. Position the tail at the back of the mouse, near the base, and use your yarn needle to sew it securely in place. For extra durability, consider reinforcing the attachment point with a few extra stitches. Now your crochet mouse is really starting to come to life!
Part | Instructions | Tips |
|---|---|---|
Ears | Crochet two small triangles | Fold the base slightly for a perky look |
Tail | Chain a long string of single crochet stitches | Make it roughly the same length as the body |
Assembling Your Crochet Mouse Cat Toy: Stuffing and Finishing Touches
Assembling Your Crochet Mouse Cat Toy: Stuffing and Finishing Touches
The Art of Stuffing: Achieving the Perfect Plumpness
Alright, so you've got your crocheted body, ears, and tail – now comes the fun part: bringing your mouse to life with stuffing! This is where you can really customize the toy to your cat's preferences. Start by gently filling the body with fiberfill, making sure to distribute it evenly to avoid any lumps or bumps. The goal is to create a firm, yet squishy toy that's both satisfying to play with and safe for your cat to chew on. I like to use small pieces of stuffing and gradually build up the volume, as this gives me more control over the final shape.
As you stuff, pay close attention to the shape of the mouse. You might want to add more stuffing to the head area to give it a rounder appearance, or focus on the body to create a more elongated shape. Remember, there's no right or wrong way to do it – it all depends on your personal preference and what you think your cat will enjoy most. Just be careful not to overstuff the toy, as this can make it too hard and less appealing to play with. A good rule of thumb is to stuff it until it feels firm but still has some give when you squeeze it.
Seaming It Up: Closing the Gaps
Once you're satisfied with the stuffing, it's time to close up any remaining openings and secure all the pieces together. This is where your yarn needle comes in handy. Thread the needle with the yarn tail you left when you finished crocheting the body, and carefully weave it through the remaining stitches around the opening. As you weave, gently pull the yarn to close the opening, creating a seamless finish. Once the opening is completely closed, tie a knot to secure the yarn and weave in the end to hide it inside the toy.
Next, it's time to attach the ears and tail, if you haven't already done so. Use your yarn needle to sew them securely to the body, making sure to position them symmetrically and reinforce the attachment points with a few extra stitches. For the ears, you might want to fold the base slightly before attaching them, giving them a perky, upright appearance. For the tail, make sure it's securely attached at the base of the body, so your cat can grab and bat it around without pulling it off. With a little care and attention, you can create a durable and long-lasting toy that your cat will enjoy for years to come.
Step | Description | Tips |
|---|---|---|
Stuffing | Fill the body with fiberfill, distributing evenly | Use small pieces and gradually build up the volume |
Closing | Weave yarn through remaining stitches to close openings | Pull yarn gently to create a seamless finish |
Attaching | Sew ears and tail securely to the body | Reinforce attachment points with extra stitches |
Finishing Touches: Adding Personality and Safety
Now that your crochet mouse is assembled, it's time to add those final touches that will make it truly special. Consider adding some embroidered details, such as eyes, a nose, or whiskers, to give your mouse a unique personality. You can use embroidery floss in contrasting colors to create these details, or even use small beads or buttons for a more three-dimensional effect. Just be sure to attach any small parts securely to prevent them from becoming a choking hazard.
Another fun idea is to add some catnip to the stuffing for extra enticement. Simply sprinkle a small amount of dried catnip inside the body before you finish stuffing it, and your cat will be instantly drawn to the toy. You can also add a small bell inside the body for added auditory stimulation. The bell will jingle as your cat plays with the toy, providing hours of entertainment. Remember to supervise your cat while they're playing with the toy, especially if it contains small parts or catnip, to ensure their safety.
Creative Variations: Customizing Your Crochet Mouse Cat Toy
Creative Variations: Customizing Your Crochet Mouse Cat Toy
Color Crazy: Playing with Yarn Combinations
Alright, so you've mastered the basic crochet mouse – now let's get those creative juices flowing! One of the easiest ways to customize your toy is by experimenting with different yarn colors. Think beyond the traditional gray and brown and try vibrant combinations that will really catch your cat's eye. Stripes, color blocking, or even a rainbow effect can add a playful touch to your creation. Consider your cat's personality – are they drawn to bright, bold colors, or do they prefer more subtle, earthy tones? Let their preferences guide your yarn choices.
Don't be afraid to mix and match different yarn textures as well. A fuzzy yarn for the body and a smooth yarn for the tail can create an interesting tactile experience for your cat. You can also use variegated yarn, which changes color as you crochet, for a unique and unpredictable look. The possibilities are endless – so go wild and have fun with it! Remember, the more visually appealing the toy, the more likely your cat is to engage with it.
Adding Accessories: Bells, Feathers, and More
Want to take your crochet mouse to the next level? Try adding some fun accessories to make it even more enticing for your feline friend. A small bell sewn inside the body will provide auditory stimulation, while feathers attached to the tail will add a playful visual element. You can also experiment with different types of stuffing, such as crinkly plastic or dried catnip, to create a more engaging sensory experience.
Just be sure to prioritize safety when adding accessories. Make sure any small parts are securely attached to prevent them from becoming a choking hazard. Avoid using sharp or pointy objects that could injure your cat. And always supervise your cat while they're playing with the toy to ensure their safety. With a little creativity and caution, you can create a truly unique and irresistible toy that your cat will adore.
Accessory | Description | Benefits |
|---|---|---|
Bell | Small jingle bell sewn inside the body | Provides auditory stimulation |
Feathers | Soft feathers attached to the tail | Adds a playful visual element |
Crinkly Plastic | Crinkly plastic added to the stuffing | Creates a stimulating tactile experience |
Catnip | Dried catnip added to the stuffing | Entices cats with its aroma |
Size Matters: Adjusting the Pattern for Different Breeds
While the basic crochet mouse pattern is a great starting point, you can easily adjust it to create toys of different sizes to suit cats of all breeds and ages. For smaller kittens, a miniature mouse might be more appropriate, while larger cats might prefer a bigger, more substantial toy. To adjust the size, simply modify the number of rounds you crochet for the body. Add more rounds to make the mouse larger, or fewer rounds to make it smaller.
You can also experiment with different yarn weights and hook sizes to further customize the size and texture of the toy. A thicker yarn and larger hook will create a larger, chunkier mouse, while a thinner yarn and smaller hook will result in a smaller, more delicate toy. Consider your cat's size, age, and play style when deciding on the appropriate size and weight for your crochet mouse. A well-proportioned toy will be more comfortable and enjoyable for your cat to play with.
Conclusion: A Handmade Toy for a Happy Cat
So, you've learned how to crochet a mouse cat toy! From humble beginnings with yarn and a hook, you've crafted a unique and engaging plaything for your feline companion. Remember, the beauty of this project lies in its simplicity and adaptability. Feel free to experiment with different colors, textures, and embellishments to create a whole family of crochet mice. Not only will your cat appreciate the handmade love, but you'll also enjoy the satisfaction of creating something special just for them. Now, go forth and crochet, and watch your kitty pounce with joy!