Table of Contents
Ever wondered how to make a cat crochet? If you're itching to create something adorable and unique, you're in the right place. This guide will walk you through crocheting your very own cuddly cat, perfect for gifting, decorating, or just adding a touch of handmade charm to your life. Forget complicated patterns and confusing jargon, we're breaking it down into easy-to-follow steps. Whether you're a crochet newbie or a seasoned pro, you'll find helpful tips and tricks to bring your feline friend to life. We'll cover everything from gathering your essential materials to mastering the basic stitches and adding those all-important finishing touches that make your crochet cat truly special. So, grab your hook and yarn, and let's dive into the wonderful world of cat amigurumi!
Essential Materials and Tools for Your Crochet Cat Project
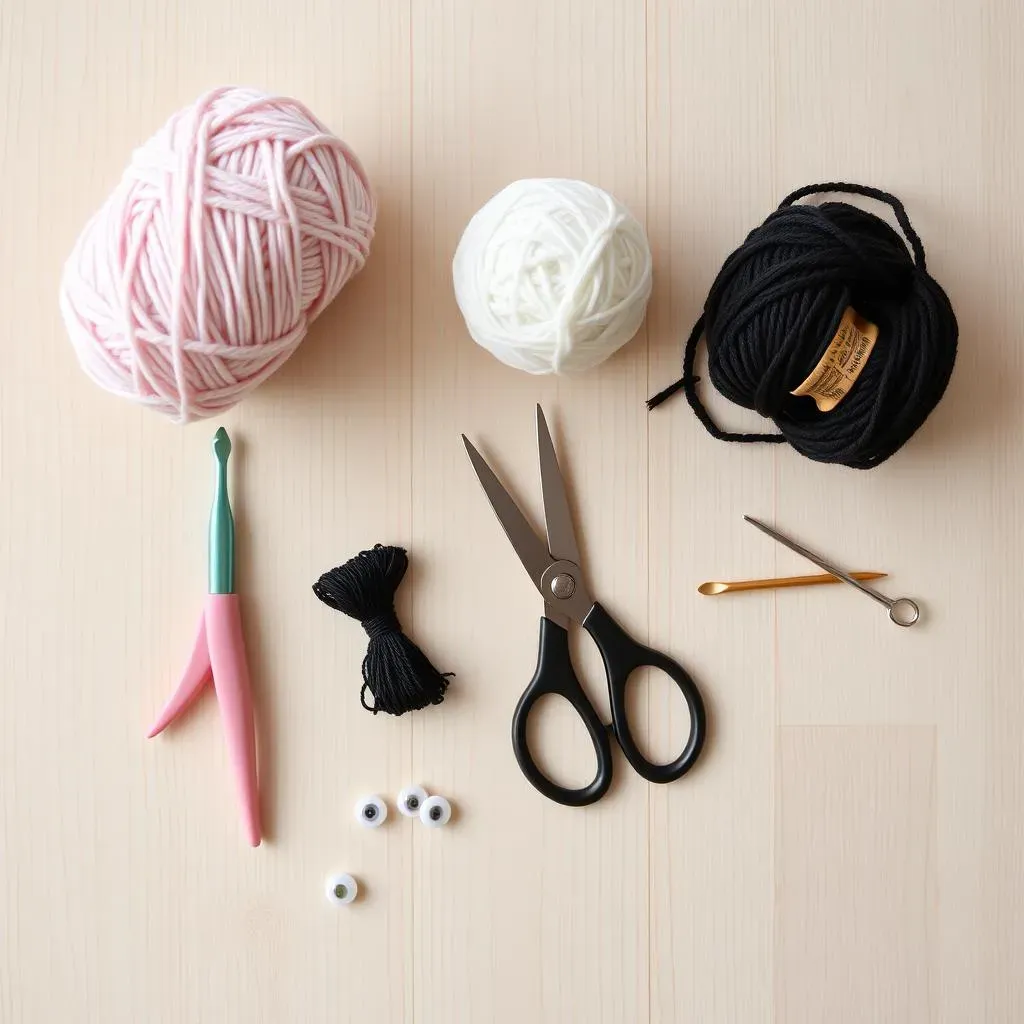
Essential Materials and Tools for Your Crochet Cat Project
Alright, so you're ready to dive into making your own crochet cat? Awesome! First things first, let's gather our supplies. You'll need a few key items to make this project a success. Think of it like prepping your kitchen before baking a cake – having everything on hand makes the whole process smoother and way more enjoyable. We're talking yarn, a crochet hook, and a few other essentials that will bring your cuddly creation to life. Don't worry, it's not a huge investment, and you might already have some of these things lying around!
Material/Tool | Description | Why You Need It |
|---|---|---|
Yarn | DK weight chenille yarn (or similar) | The foundation of your cat! Chenille is soft and cuddly. |
Crochet Hook | 3mm hook (or size appropriate for your yarn) | To create the stitches that form your cat. |
Safety Eyes | 6mm-8mm (or desired size) | To give your cat character and expression. |
Stuffing | Polyester fiberfill | To give your cat its plush, huggable shape. |
Embroidery Floss/Yarn | Black or desired color | For adding the nose and mouth details. |
Scissors | Sharp scissors | For cutting yarn. |
Yarn Needle | For weaving in ends. | To hide those pesky yarn tails and make your project look professional. |
Mastering the Crochet Stitches: A Beginner's Guide to Cat Amigurumi
Mastering the Crochet Stitches: A Beginner's Guide to Cat Amigurumi
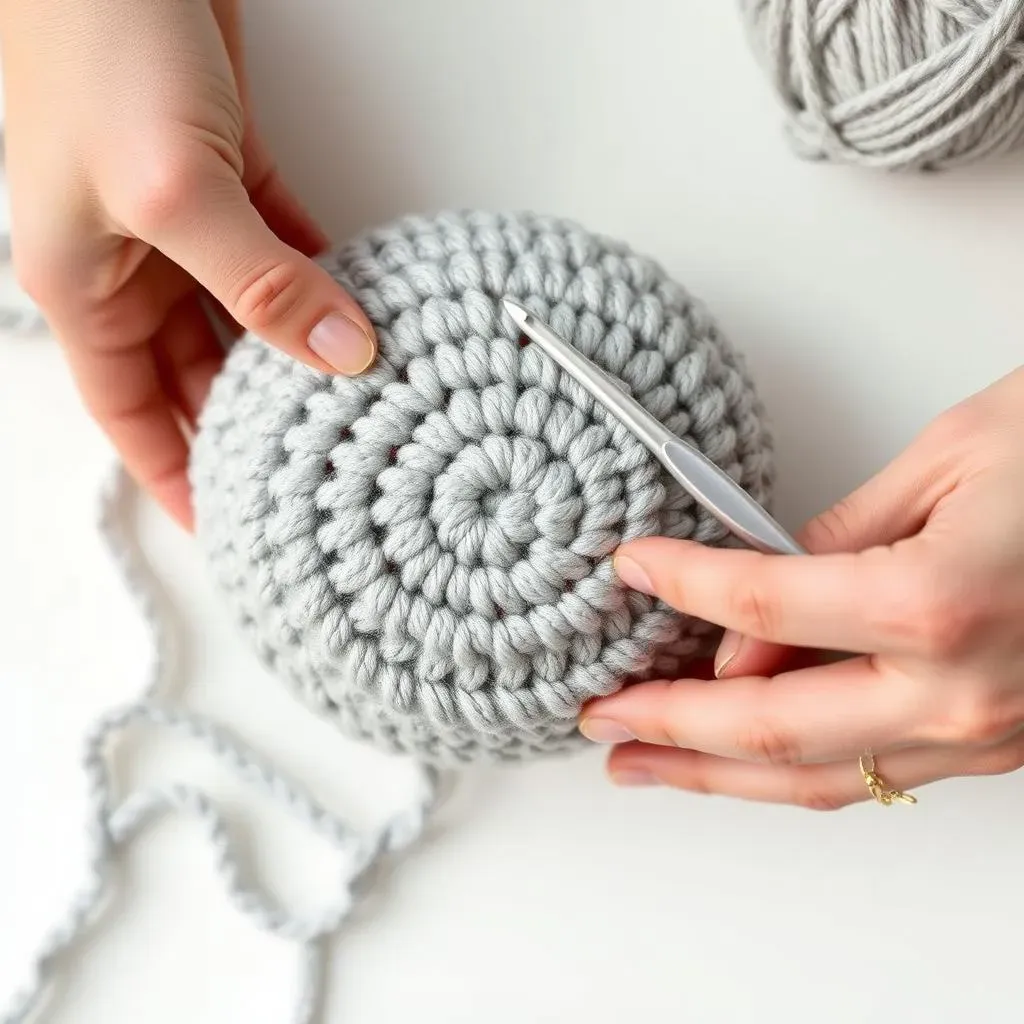
The Magic Circle: Your Amigurumi Foundation
Alright, let's talk stitches! If you're new to amigurumi (that's the art of crocheting small, stuffed toys), the magic circle is your best friend. Seriously, it's the foundation for almost everything. Instead of starting with a chain and joining, the magic circle lets you create a tightly closed center, which is crucial for avoiding holes in your finished project. Nobody wants stuffing escaping from their kitty!
There are tons of tutorials online, so don't be afraid to watch a few different videos until you find a method that clicks for you. The basic idea is to create a loop of yarn, work your stitches into that loop, and then pull the tail tight to close the circle. It might feel a little awkward at first, but trust me, once you get the hang of it, you'll be whipping out magic circles like a pro.
Single Crochet: The Amigurumi Workhorse
Next up: the single crochet (sc). This is *the* stitch you'll be using the most for your crochet cat. It's simple, creates a tight fabric, and is perfect for shaping. To make a single crochet, insert your hook into the stitch, yarn over, pull through a loop (you'll have two loops on your hook), yarn over again, and pull through both loops. Boom! You've got a single crochet.
Consistency is key here. Try to keep your tension even so your stitches are all the same size. This will give your cat a smooth, uniform look. And don't worry if your first few rows look a little wonky – practice makes perfect! Just keep crocheting, and you'll get the hang of it in no time. Plus, a slightly imperfect cat just adds to its charm, right?
Stitch | Abbreviation | Description |
|---|---|---|
Magic Circle | MC | Creates a closed center for starting amigurumi. |
Single Crochet | sc | Basic stitch used for creating a tight, dense fabric. |
Increase | inc | Work two single crochet stitches into the same stitch. |
Decrease | dec | Invisible decrease. |
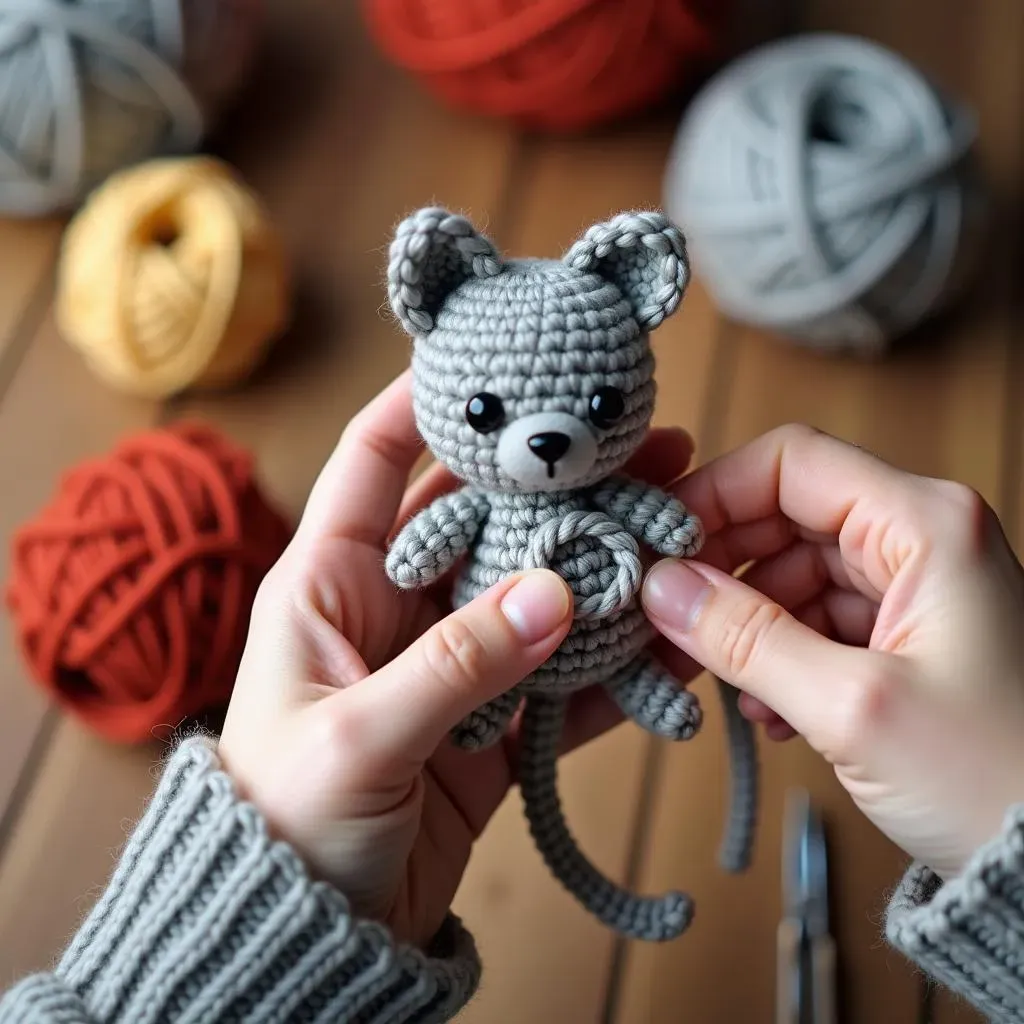
StepbyStep Instructions: How to Make a Cat Crochet from Start to Finish
StepbyStep Instructions: How to Make a Cat Crochet from Start to Finish
Crocheting the Cat Body
Alright, let's get to the good stuff – actually making the cat! We're going to start with the body, working from the bottom up. Remember that magic circle we talked about? That's where it all begins. Follow these steps carefully, and don't be afraid to frog (that's crochet-speak for undoing your work) if you make a mistake. It happens to the best of us!
Start with a magic circle. Then, single crochet 6 stitches into the magic circle. Pull the tail tight to close the circle. This forms the base of your cat. Now, for round 2, increase in each stitch around (that means putting two single crochets in each stitch). You should now have 12 stitches. For round 3, *single crochet in the next stitch, increase in the next stitch* repeat from * to * around. You should now have 18 stitches. Continue increasing in this manner, adding 6 stitches each round, until your base is the desired size (about 3-4 inches in diameter). As you crochet, keep stuffing the body with fiberfill to give it shape.
Adding the Ears
Once the body is the desired size, it's time to add the ears. For each ear, work in the front loops only for a few stitches to create a slightly raised edge. This will help the ears stand out. Crochet the ears directly onto the body as you go, following the pattern's instructions for placement. This no-sew method makes the process much easier and gives a seamless look.
To make the ears, in the round where you want to place the ears, work in front loops only for the next 3 stitches, then continue with normal single crochet for the rest of the round. On the next round, single crochet in each of the front loop only stitches, then continue as normal. Repeat this for 2-3 rounds to create a small flap. Then, fold the flap in half and stitch it closed to form the ear shape. Repeat on the other side of the head to create the second ear.
Round | Instructions | Total Stitches |
|---|---|---|
1 | Magic Circle, sc 6 | 6 |
2 | inc in each stitch around | 12 |
3 | *sc in next stitch, inc in next stitch* repeat around | 18 |
... | Continue increasing until desired size | ... |
Crafting the Feet with Popcorn Stitches
The feet are made using popcorn stitches, which add a cute, textured detail. A popcorn stitch is essentially a group of double crochets worked into the same stitch, then joined together at the top to create a "popcorn" effect. Follow the pattern's instructions for placing the popcorn stitches around the base of the body to create the feet. Be sure to stuff the feet firmly to maintain their shape.
To make a popcorn stitch, work 5 double crochet stitches into the same stitch. Then, remove your hook, insert it into the first double crochet of the group, and pull the last loop through to close the popcorn. This creates a raised, textured stitch that looks like a little kernel of popcorn!
Personalizing Your Crochet Cat: Tips for Adding Unique Details and Finishing Touches
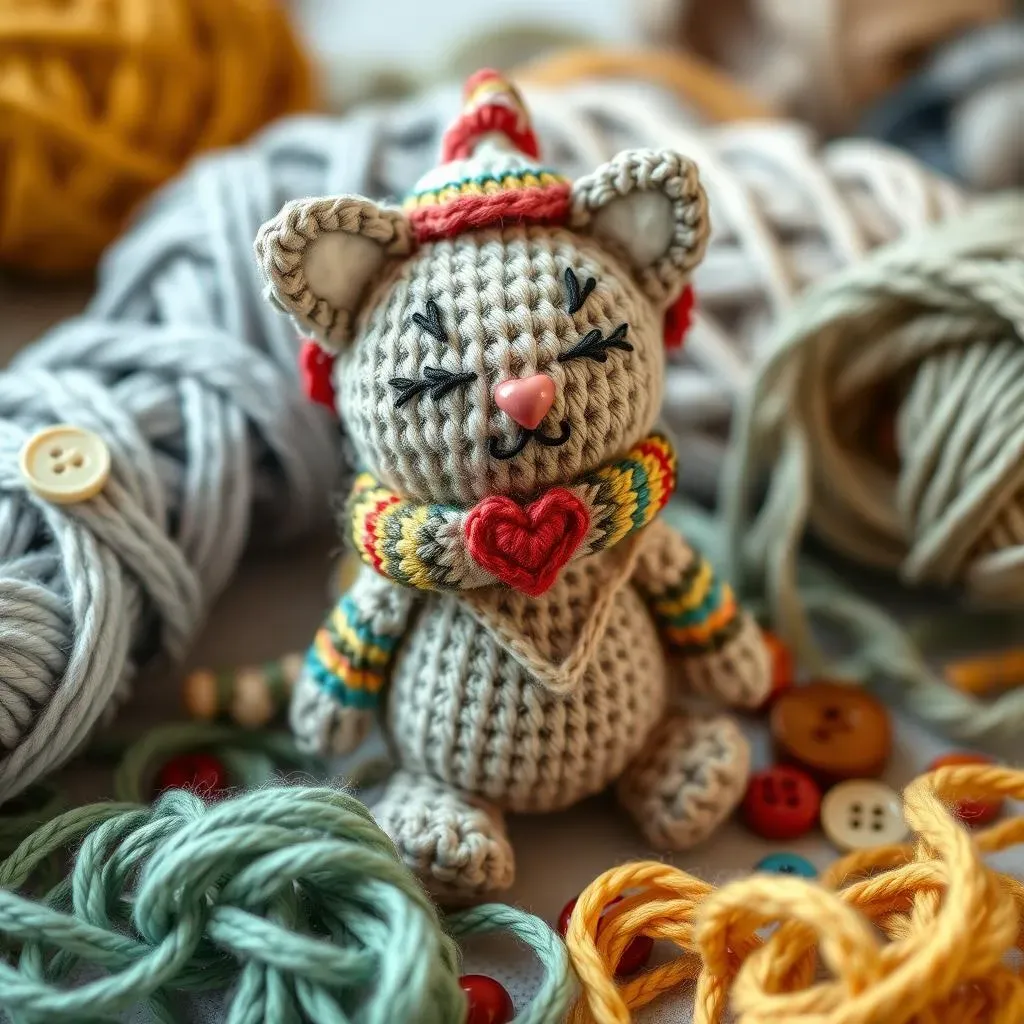
Personalizing Your Crochet Cat: Tips for Adding Unique Details and Finishing Touches
Embroidered Details: Adding Personality to Your Feline Friend
so you've got the basic cat shape down – awesome! Now comes the really fun part: giving your kitty its own unique personality. Embroidery is your secret weapon here. Think about adding little details like stripes, spots, or even a cute little heart on its chest. You can use embroidery floss or even just some leftover yarn to create these details. Don't be afraid to experiment and get creative!
When it comes to the face, embroidery can really bring your cat to life. Consider adding whiskers, a sweet little smile, or even some expressive eyebrows. Use a yarn needle to carefully stitch these details onto the face, following the shape and placement you desire. Remember, there's no right or wrong way to do this – it's all about creating a cat that reflects your own personal style.
Accessorizing Your Crochet Cat: Hats, Scarves, and More!
Why stop at embroidery? Let's take things to the next level with some adorable accessories! A tiny crochet hat or scarf can add a touch of whimsy and charm to your cat. You can find tons of free patterns online for miniature accessories, or even just wing it and create your own designs. Think about using different colors and textures to make your accessories stand out.
Beyond hats and scarves, consider adding other embellishments like buttons, beads, or even little felt shapes. These can be glued or sewn onto your cat to create even more visual interest. For example, a tiny button eye patch can give your cat a pirate-chic look, while a few strategically placed beads can add some sparkle and shine. Just be sure to use child-safe materials if you're making a cat for a little one.
Accessory | Material | How to Attach |
|---|---|---|
Hat | Yarn | Crochet or sew on |
Scarf | Yarn | Tie around neck or sew on |
Buttons | Plastic or wood | Sew on |
Beads | Glass or plastic | Sew on |
Experimenting with Different Yarns and Colors
Don't feel limited to just one type of yarn or color! Experimenting with different materials can dramatically change the look and feel of your crochet cat. Try using a fuzzy yarn for a super cuddly kitty, or a variegated yarn for a colorful, striped effect. You can even mix and match different yarns to create unique textures and patterns.
When it comes to color, the possibilities are endless. Consider using your cat's fur color as inspiration, or go wild with unexpected combinations. A bright pink cat with green spots? Why not! The key is to have fun and let your creativity shine. After all, crochet is all about expressing yourself and creating something that you truly love.
Crafting Your Crochet Cat: A Rewarding Creative Journey
Learning how to make a cat crochet opens up a world of possibilities for handmade gifts and personalized creations. From selecting your favorite yarn to adding unique details, each step allows you to express your creativity and bring a touch of feline charm into your life. Whether you're a beginner or an experienced crocheter, the satisfaction of completing your own amigurumi cat is truly rewarding. So, grab your hook, follow the steps, and enjoy the process of bringing your adorable crochet companion to life!