Table of Contents
Let's be honest, buying cat toys can feel like a gamble. You bring home something shiny and new, convinced this is *the one*, only for your feline overlord to sniff it once and walk away, preferring the cardboard box it came in. It's frustrating, right? Especially when you just want to see them happy and engaged.
Why Bother with a Crochet Mouse Cat Toy?
Why Bother with a Crochet Mouse Cat Toy?
Are Store Toys Just Landfill Waiting to Happen?
Walk into any pet store, and you're hit with a wall of brightly colored cat toys. Little mice, plastic balls with bells, feathery things on sticks. Your cat plays with them for approximately five minutes before batting them under the couch or deciding they prefer chewing on a dust bunny. It feels like throwing money away, doesn't it? Especially when those flimsy things fall apart faster than a cheap umbrella in a hurricane.
Spending five, ten, even twenty bucks on a single toy that might be ignored is a common complaint among cat owners. Then there's the question of materials. What exactly is in that fuzzy fabric or that plastic rattle? Making your ownmouse cat toy crochet patterngives you control. You know exactly what yarn you're using (ideally natural fibers like cotton or wool, avoiding acrylic if your cat is a chewer), and you can skip the questionable fillers or tiny plastic bits that could become a choking hazard.
The Appeal of Handmade (and Using Up Scraps)
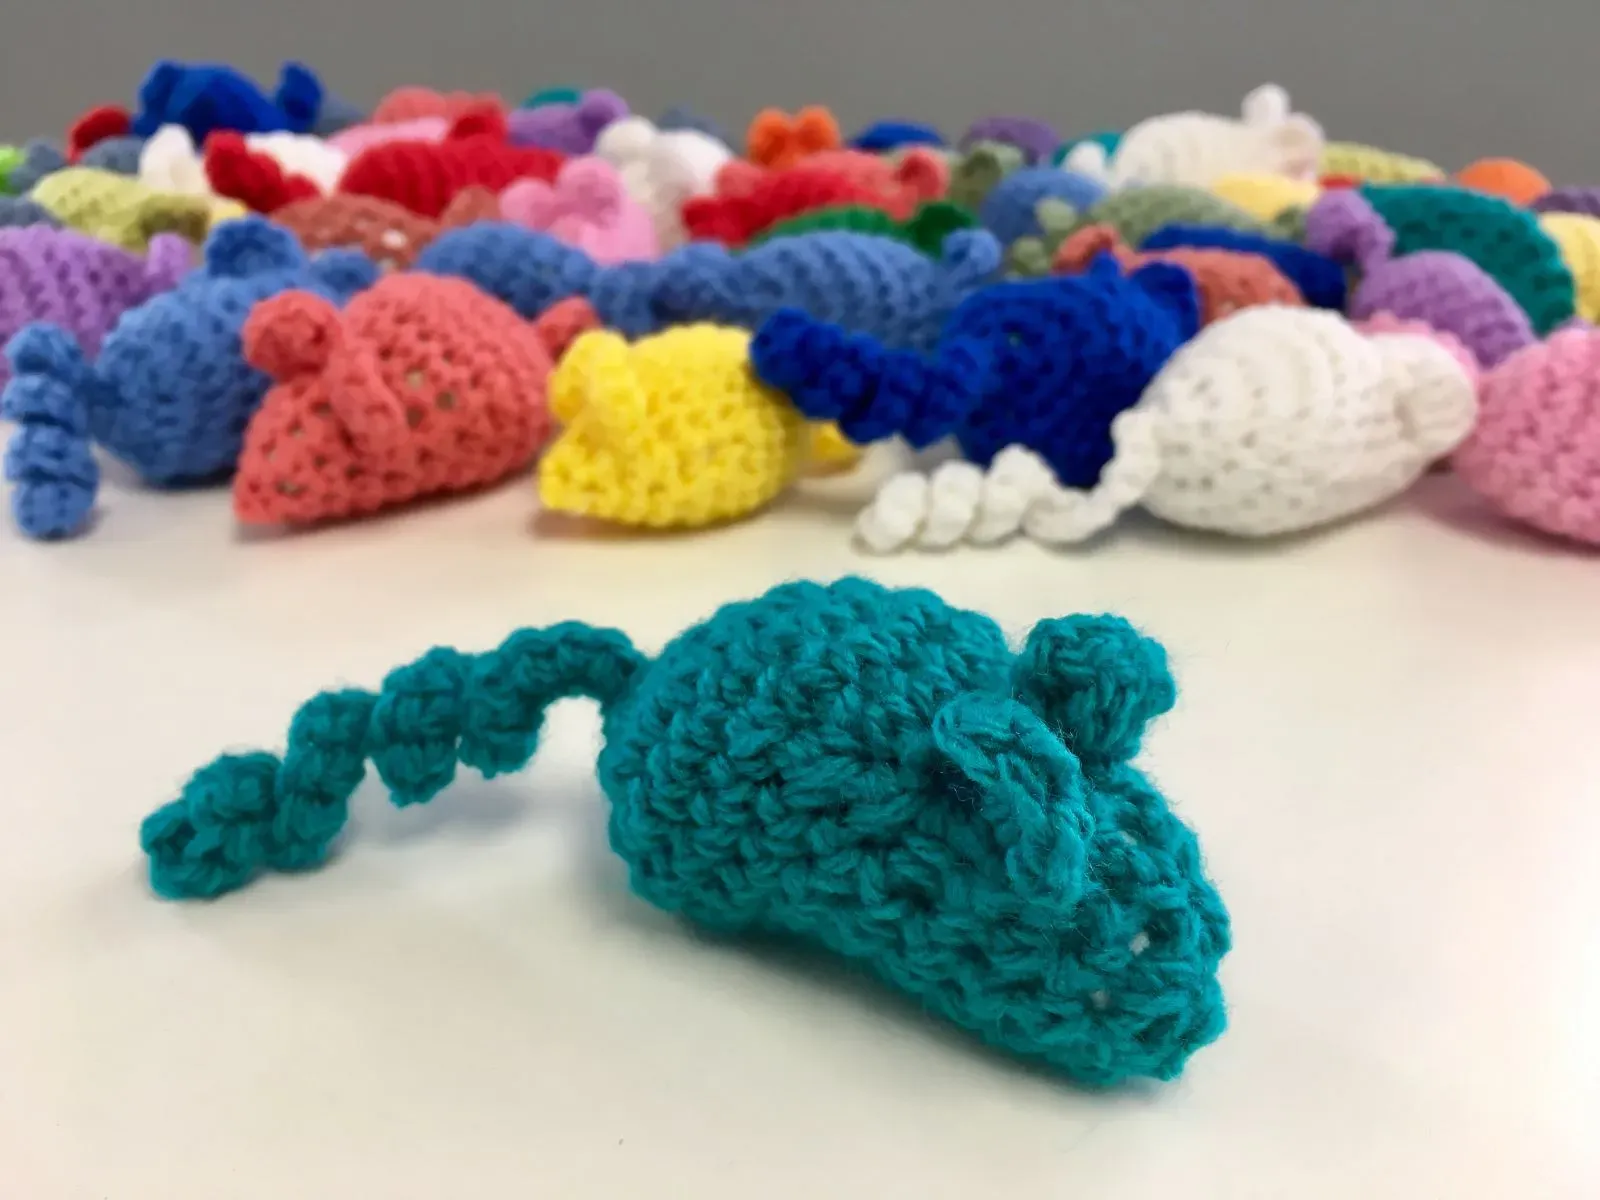
There's a certain satisfaction in making something yourself, even if it's just a lumpy little mouse for a creature who will likely try to disembowel it within an hour. It's a low-stakes project, perfect for practicing crochet stitches without the pressure of making a wearable item. Got a bunch of small balls of yarn left over from bigger projects? This is their moment to shine. That weird variegated purple and green yarn you regret buying? Perfect for a psychedelic mouse.
Plus, cats often respond well to the texture and scent of fiber. A crochet mouse feels different under their paws and in their mouth than slick plastic. Some theories suggest the slightly rough texture is satisfying for their teeth and claws. And let's not forget the optional, but highly recommended, addition of catnip. A handmade mouse stuffed with potent catnip is often far more enticing than the stale stuff in a store-bought toy.
Here's why crocheting your own might be worth the minimal effort:
- Cost-effective: Usually just requires scrap yarn.
- Material Control: Choose safe, natural fibers.
- Customizable: Add catnip, different textures, or sizes.
- Uses Up Stash: Great for leftover yarn bits.
- Satisfying Project: Quick and easy to complete.
- Potential Cat Favorite: Handmade can be more appealing than store-bought.
Finding Your First Mouse Cat Toy Crochet Pattern
Finding Your First Mouse Cat Toy Crochet Pattern
So, Where Do You Even Find a Pattern?
you're convinced. You're ready to ditch the pet store aisle and make your own. But where do you start looking for amouse cat toy crochet pattern? The internet, obviously. Ravelry is a massive database of knitting and crochet patterns, and you can filter by "free" and "toy" or "animal." Pinterest is another goldmine, though sometimes it leads you down rabbit holes of sparkly yarn you don't need. A quick Google search for "free crochet mouse pattern for cats" will also bring up plenty of options from blogs and craft websites.
Don't feel pressured to find the most complicated, realistic mouse pattern out there for your first attempt. Remember, the target audience here is a creature who finds a bottle cap fascinating. Simple shapes work just fine. Some patterns are just a basic cone or tube shape with ears and a tail added. Others are full-blown amigurumi, meaning they are crocheted in the round to create a 3D stuffed object, often with embroidered faces. Start simple to get a feel for it.
Picking a Pattern That Won't Make You Tear Your Hair Out
Finding a freemouse cat toy crochet patternis easy; finding one that's well-written and easy to follow is the trick. Look for patterns that clearly state the skill level required (many mouse patterns are beginner-friendly). Read through the pattern first before you even pick up your hook. Does it use terms you understand? Does it have photos, especially for crucial steps like attaching ears or tails? A good pattern won't assume you're a crochet guru; it will explain the stitches and techniques needed.
Also, check the comments or reviews if the site has them. Did other people find it easy or confusing? Did their finished mouse actually look like a mouse, or more like a lopsided potato? These little clues can save you a lot of frustration. Don't be afraid to try a different pattern if the first one you look at seems like it's written in code.
Here are some common places to hunt for free patterns:
- Ravelry (Filter by 'free' and 'toy')
- Pinterest (Be ready for endless scrolling)
- Craft Blogs and Websites (A simple search works)
- YouTube (Video tutorials can be helpful)
Exploring Free Mouse Cat Toy Crochet Patterns Galore
Exploring Free Mouse Cat Toy Crochet Patterns Galore
Seriously, There Are *So* Many Free Ones
so you've decided to dive in. The good news? The internet is absolutely overflowing with freemouse cat toy crochet patternoptions. It's almost overwhelming, like standing in the candy aisle as a kid. You'll find patterns ranging from super simple, designed for absolute beginners using basic stitches like single crochet, to slightly more involved amigurumi styles with shaping and tiny embroidered faces. Some are just written instructions, others come with step-by-step photos, and a good chunk now have video tutorials, which can be a lifesaver if you're a visual learner or get stuck on a specific step. Don't feel like you have to pick the first one you see. Spend a few minutes browsing to find a style that looks appealing and a pattern format that seems easy to follow.
From Lumpy Potatoes to Adorable Critters
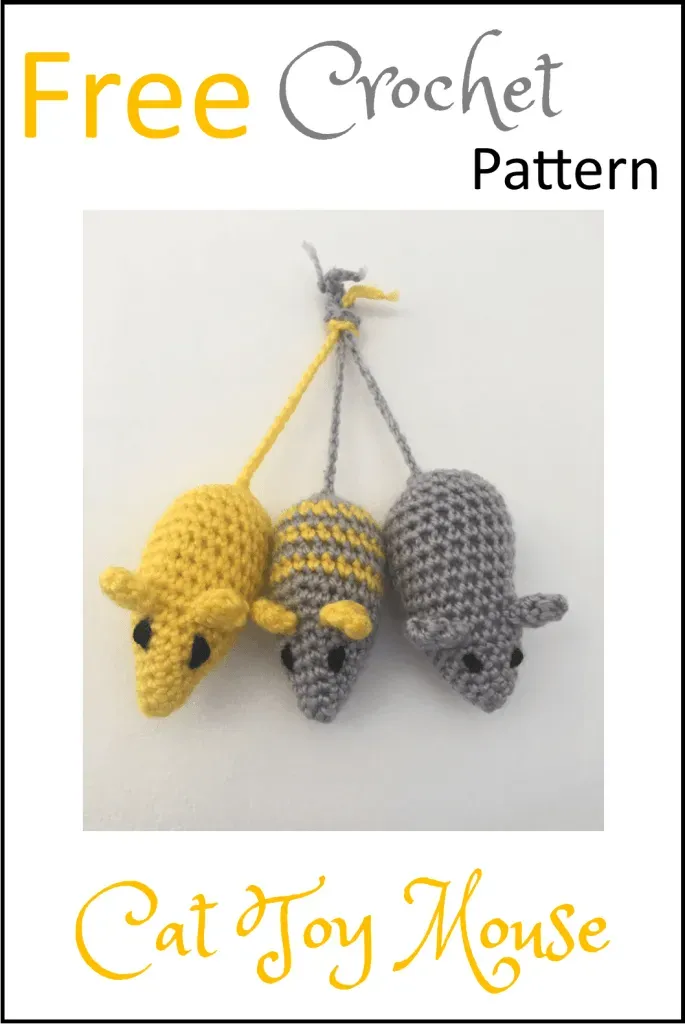
As you start looking, you'll notice patterns fall into a few camps. There are the minimalist mice – often just a cone or teardrop shape, maybe with simple chain stitch ears and a tail. These are fantastic for using up tiny scraps and work up in minutes. Then you have the amigurumi mice, which are usually worked in the round, starting from the nose and increasing to create a body shape, then decreasing towards the tail end. These often have separate pieces for ears and sometimes feet, requiring a bit of sewing (the part many crocheters dread, myself included). Some designers get really creative, adding little noses, whiskers, or even tiny outfits (though I suspect the cat cares less about the outfit and more about the potential for destruction).
What kind of mouse vibe are you going for?
- The Speedy Scrap Buster: Simple cone/tube shape, minimal parts.
- The Classic Amigurumi: Worked in the round, stuffed body, separate ears.
- The Character Mouse: Adds details like embroidered faces, different tail styles (straight, curly).
Choosing Based on Yarn and Effort Level
When picking yourmouse cat toy crochet pattern, think about the yarn you have on hand. Most patterns suggest worsted weight yarn, which is pretty standard, but you can definitely use chunkier or thinner yarn – just know your mouse will end up bigger or smaller. Cotton yarn is durable and less likely to fuzz up into tempting ingestion hazards, but acrylic scraps are also fine, especially if your cat is more of a bat-and-chaser than a dedicated chewer. Consider how much time you want to spend. A simple pattern might take 15-30 minutes, while a more detailed amigurumi version could take an hour or more. If you're planning to make a whole litter of mice, speed might be a priority.
Stuffing, Catnip, and Safety: Finishing Your Crochet Mouse Toy
Stuffing, Catnip, and Safety: Finishing Your Crochet Mouse Toy
Choosing the Right Stuffing (Hint: It's Not Just Fluff)
You've crocheted your little mouse shell. Now comes the crucial step: stuffing. Don't just grab any old cotton balls or fabric scraps. The standard polyfill used for stuffed animals works fine, but there are better options. Consider using small pieces of leftover yarn scraps as stuffing. This adds weight and texture that some cats enjoy, and it's another way to use up your stash. Just make sure the pieces are small enough they won't cause lumps. Avoid anything that could be easily pulled out in long strands. The goal is a firm, but not rock-hard, mouse that holds its shape but is still satisfying to bite and kick. Pack it in pretty tight, especially towards the nose, so it doesn't collapse after a few vigorous play sessions.
The Magic of Catnip (Or Why Your Cat Might Ignore It Anyway)
Ah, catnip. The secret weapon for manymouse cat toy crochet patterncreations. You can mix dried catnip directly into the polyfill or yarn scraps before stuffing. A little goes a long way, but don't be shy. Some people even suggest putting the finished toy in a sealed bag with extra catnip for a day or two to really infuse it. However, a word of caution: not all cats react to catnip. It's genetic. If your cat is one of the roughly 30% who are immune to its charms, don't take it personally. The mouse is still a toy, even without the psychoactive herbs. You can also try silvervine or valerian root, which affect some cats who don't respond to catnip. Experiment to see what gets your particular feline going.
Here are some stuffing options:
- Polyfill (standard fiberfill)
- Yarn Scraps (cut into small pieces)
- Dried Catnip (mixed with stuffing)
- Silvervine or Valerian Root (alternatives to catnip)
Securing Everything and Checking for Hazards
Once stuffed, you need to close up your mouse securely. This usually involves stitching the opening closed. Use the same yarn color or something close, and pull your stitches tight. You don't want stuffing leaking out. If your pattern includes separate ears or a tail, attach them firmly. Tug on them hard. If they seem loose, reinforce them. Tiny pieces can be a choking hazard. If you've added embroidered eyes or noses, make sure the yarn is pulled taut and the ends are woven in securely on the inside. Avoid plastic eyes or noses unless they are specifically designed for pet toys and attached with extreme prejudice. A simple French knot for an eye or a few straight stitches for a nose is often safer and just as effective. Give the finished mouse a final once-over, checking for any loose ends or weak points before handing it over for the inevitable pounce.
Making a Pile: More Mouse Cat Toy Crochet Patterns
Making a Pile: More Mouse Cat Toy Crochet Patterns
One Mouse is Never Enough
so you've successfully wrangled yarn into something vaguely mouse-shaped. Maybe your cat batted it, maybe they ignored it, but you made it! Now you have a taste for it, and you're looking at that pile of scrap yarn thinking, "I could make a whole army of these." And you should. Cats are notoriously good at losing toys under furniture or just generally abandoning them in random corners. Having a stash means there's always one ready for action (or ready to be ignored). Going back to Ravelry, Pinterest, or Google, you'll find endless variations on themouse cat toy crochet pattern. Some have longer, curlier tails, some are chubbier, some have exaggerated ears. Each designer has their own take, and trying a few different patterns can be a fun way to see which style you prefer making, and more importantly, which style your cat prefers dismantling.
Thinking about your next mouse? Ask yourself:
- Does my cat prefer a specific size?
- Do they like a certain tail type (long, short, curly)?
- Do I want to try a more complex pattern?
- What yarn colors do I need to use up?
Level Up Your Mouse Game (Slightly)
Once you've mastered a basicmouse cat toy crochet pattern, you might feel brave enough to try something a little more involved. Maybe a pattern that uses color changes to give the mouse a little white belly, or one that incorporates different stitches for texture. Some patterns include instructions for adding little felt ears or leather tails for extra durability (though again, ensure these are securely attached). It’s still a low-commitment project, but trying a new technique on a small toy is a great way to learn without tackling a huge blanket or sweater. You might find you actually enjoy sewing on those tiny ears after all, or maybe you'll confirm your deep-seated hatred for yarn needles. Either way, you're building skills and providing potential entertainment for your feline overlord.
Pattern Type | Effort Level | Potential Cat Appeal |
|---|---|---|
Simple Cone/Tube | Easy/Beginner | High (Quick, basic shape) |
Amigurumi Mouse | Medium | High (More realistic shape, good for stuffing) |
Mouse with Added Features (Ears, Whiskers) | Medium/Harder | Variable (Depends on cat's preference for detail) |
Your Cat's New Favorite (Maybe)
So, you've armed yourself with amouse cat toy crochet pattern, some yarn scraps, and a bit of hope. You've created a small, fuzzy offering to the feline gods. Will they immediately pounce and declare it the greatest toy ever? Maybe. Maybe not. Cats are, after all, creatures of exquisite mystery and occasional indifference. But you've put in the effort, crafted something simple and potentially enticing, and used up some stash yarn in the process. Even if it only provides a few minutes of entertainment before being ignored under the sofa, that's a few minutes more than many store-bought toys manage. Plus, you made it yourself. There's a quiet satisfaction in that, even if your cat remains unimpressed. Good luck out there.